How to Set Up Your Enhance Server Backup VPS

Note: This guide is now outdated as Enhance v12 has been released. For the updated method to transition your backup server, follow this new guide: From BTRFS to Ext4 – A Smooth Backup Server Transition Without the Pain.
Historical walkthrough: The steps below preserve the original Btrfs setup. Since Enhance v12, the Backup role uses a directory on a local filesystem that supports hard links; Ext4 is suitable. New installs do not need the old raw-device formatting flow. See Enhance’s current installation instructions before preparing storage. Keep an existing backup copy until you have checked your replacement.
Enhance’s backup system makes a dedicated storage VPS useful for keeping incremental website backups. The original version of this walkthrough used Btrfs. Whether you plan daily backups or a more frequent window, leave room for your retained history and check that backups actually finish. We covered the setup of the backup role in a previous post, which you can check out here.
But How Do You Prepare Your VPS Drive for Enhance Backups?
This guide walks through the original VPS installation, from the provider console to the backup partition. You’ll need control of a new or disposable VPS, its console, and an administrator account. Reinstalling and repartitioning erase data—do not follow these steps on a server holding your only backups. The historical Btrfs role required a raw block device, which could be:
- A RAID array, a single disk, an SSD, a SAN, an iSCSI volume, or a partition of any of these.
- For that historical flow it had to be unmounted, because Enhance formatted it with Btrfs and deleted existing data. This is not the current directory-based setup.
We used AlphaVPS for this example. The original November 2024 offer was a 1TB storage VPS for €4 a month; treat that as historical pricing and check the provider’s current plans, bandwidth and locations before ordering. The same preparation ideas apply to another provider with a console and ISO support.
Steps to Set Up Your Enhance Server Backup VPS:
The screenshots are the original November 2024 AlphaVPS and Ubuntu installer screens. They show the historical choices; today’s labels and available images may differ.
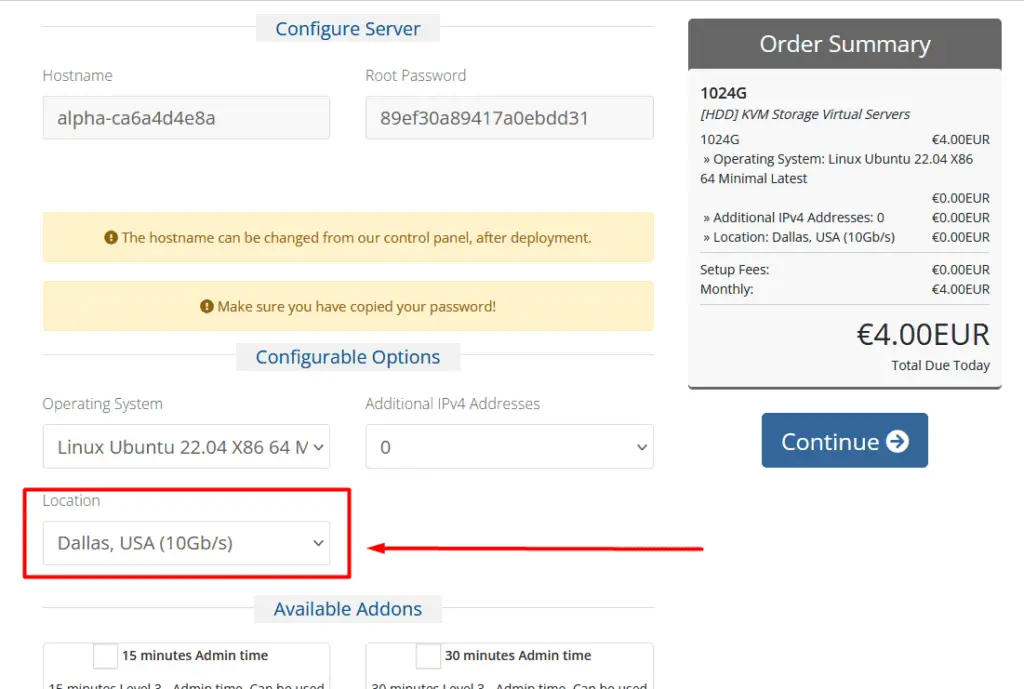
- Order Your VPS from AlphaVPS. The original example used the 1TB plan. Size your server for the actual data, retention, growth and backup workload; a site count alone is not a reliable capacity estimate. Larger plans may be needed.
- Choose Location: Choose a location with suitable latency and transfer capacity for your cluster. The original screenshot shows Dallas; it is not a universal fastest choice.
- Set Up DNS Records: Once you receive your VPS details, log in to your client area, retrieve your IPv4/IPv6, and set up your A/AAAA records with your hostname (e.g.,
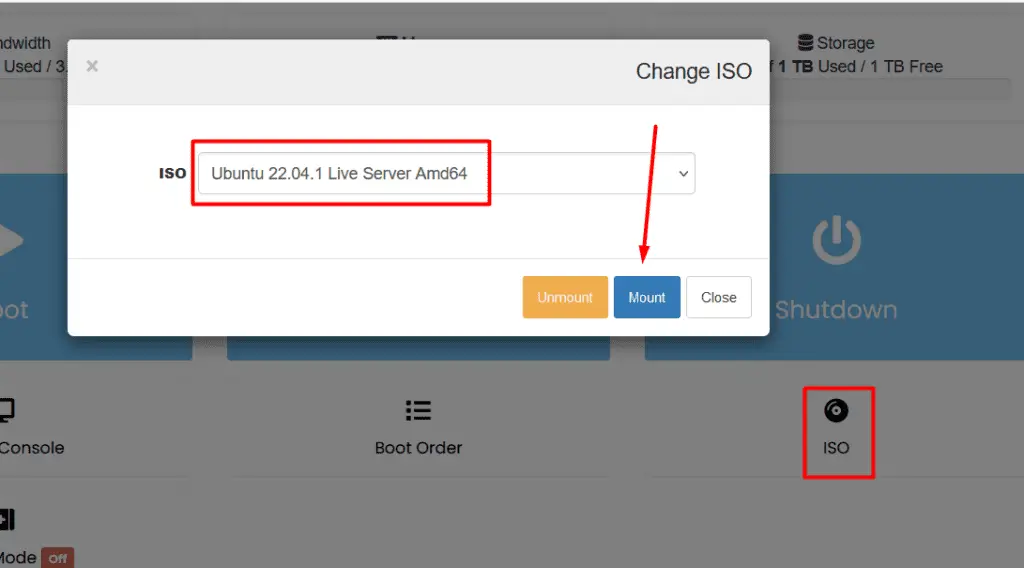
bkpsrv1.yourdomain.com). You can grab the ips in the AlphaVPS client area by navigating to Product Details > Server Information > Edit Hostname. - Mount the ISO: In your client area, go to Server Information > ISO. Choose an available Ubuntu 22.04 or 24.04 Server ISO and click Mount. The screenshot shows the older Ubuntu 22.04 option. Confirm the selected ISO is mounted before rebooting; no success message does not prove it worked.
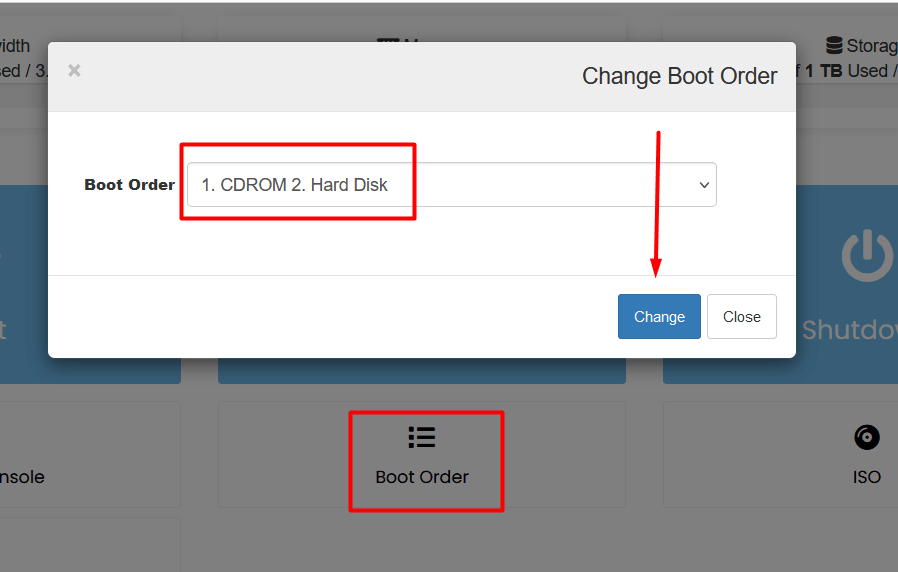
- Set Boot Order: Go to Boot Order, select “1. CDROM 2. Hard Disk,” and save the changes.
- Reboot and Open Console: Click Reboot, then open the noVNC Console.
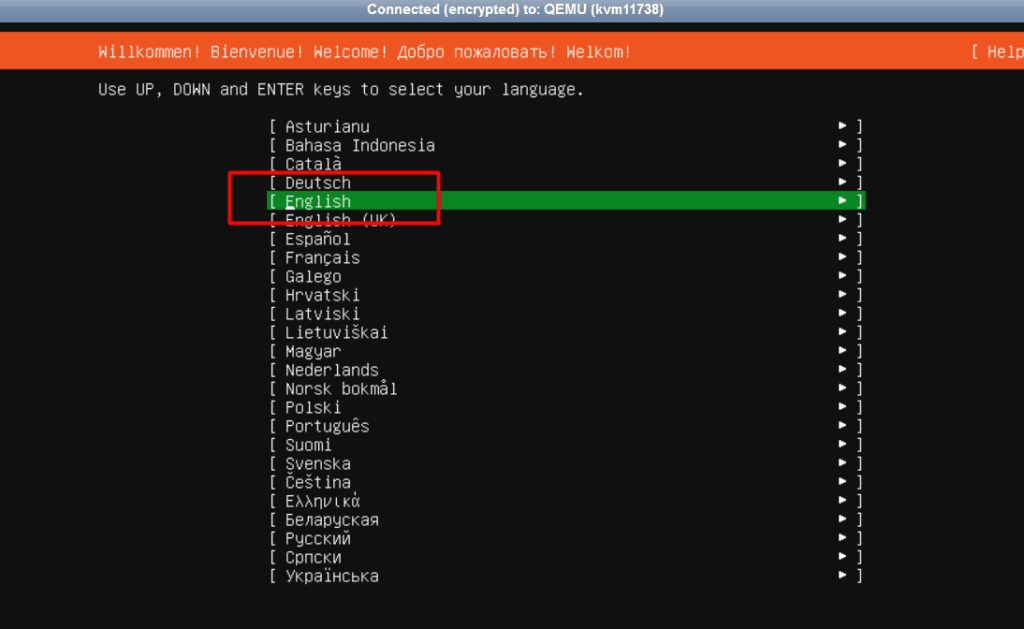
- Language Selection: When Ubuntu Live Server starts, confirm English by pressing Enter.
- Installer Update: Choose “Update to the new installer” and press Enter.
- Keyboard Layout: Confirm the default English keyboard layout and press Enter.
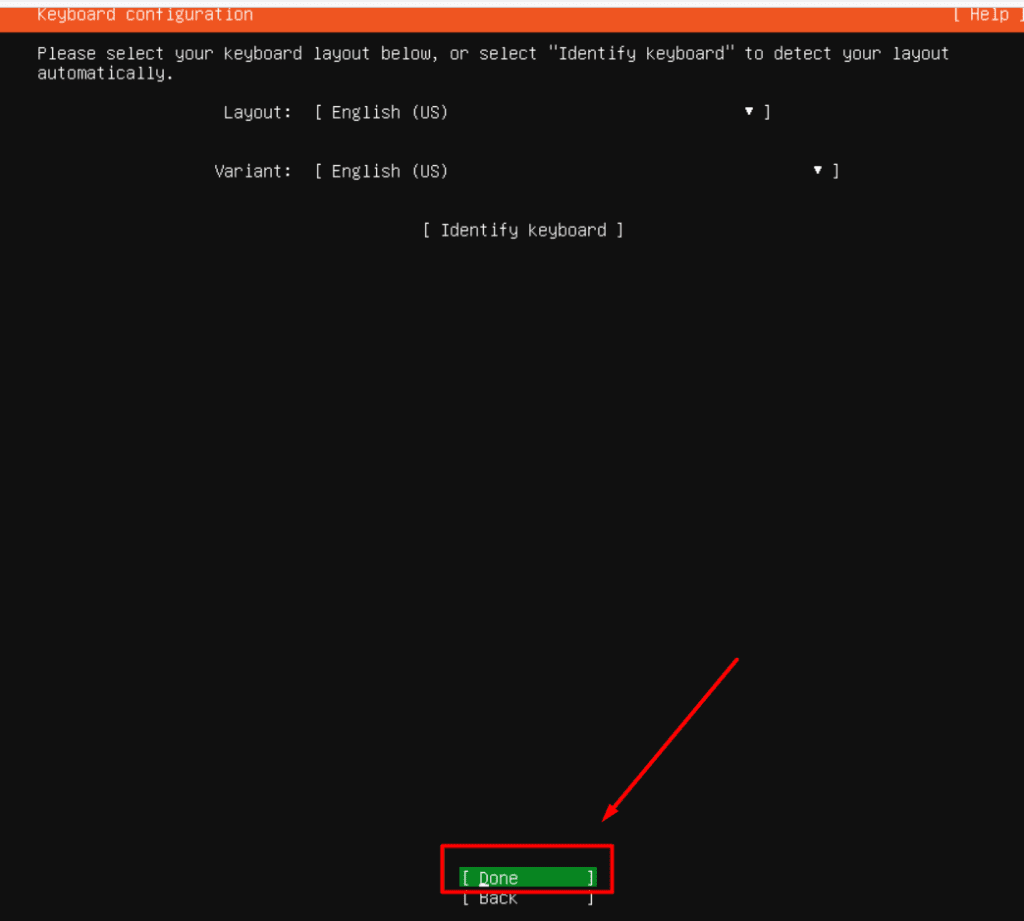
- Installation Base: Select “Ubuntu Server” and press Enter.
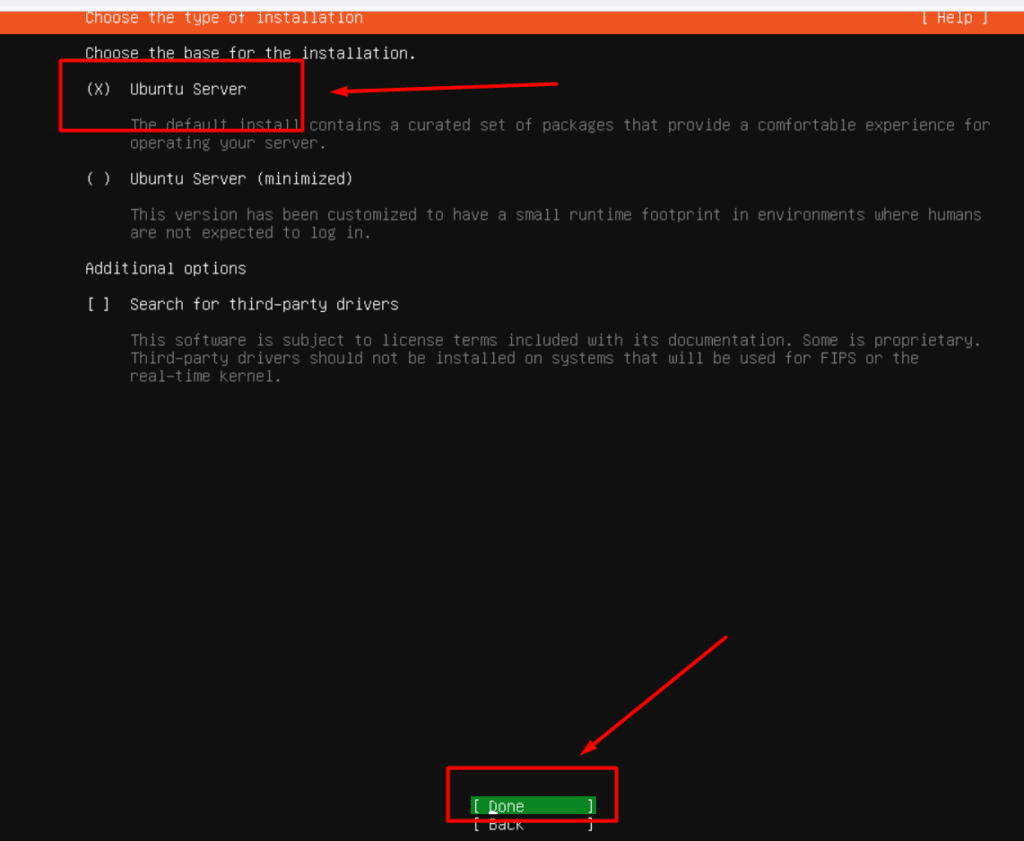
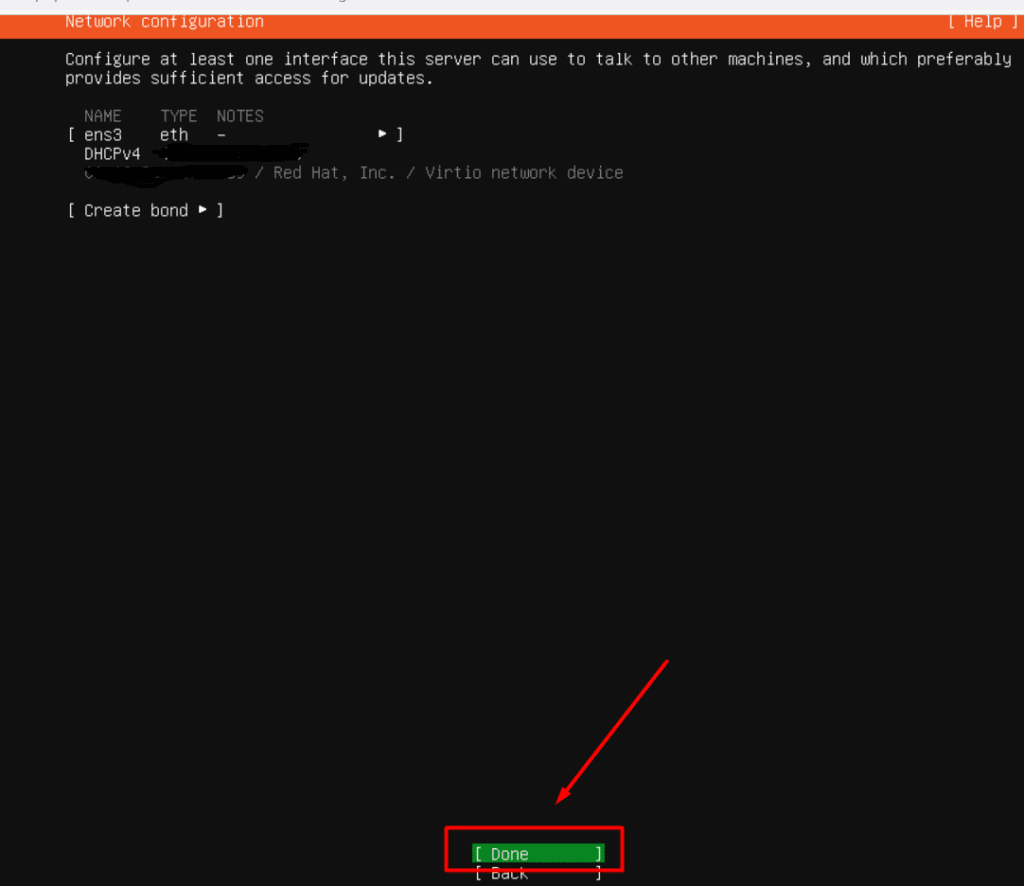
- Network, Proxy, and Mirror Configurations: Check the network matches the provider’s assigned addresses. Keep the proxy and mirror defaults if appropriate for your network, then continue.
- Storage Layout: On the “Guided Storage Configuration” page, choose “Custom Storage layout” by navigating with the down arrow and selecting it with the spacebar.
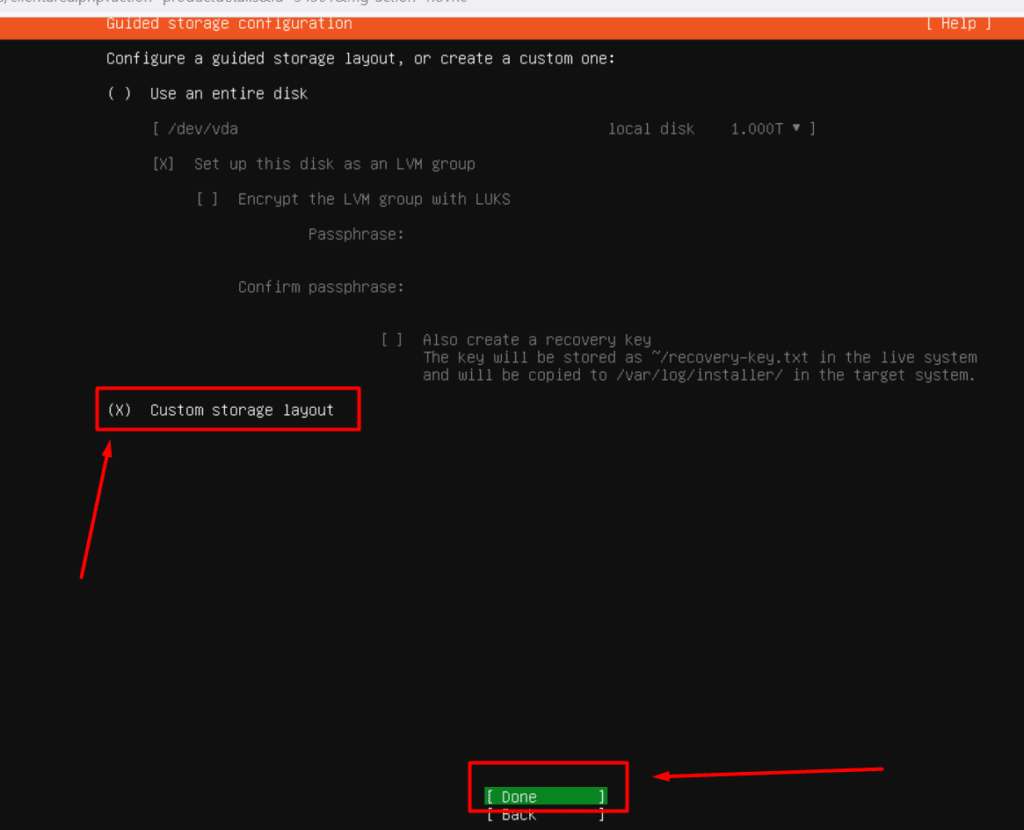
- Format the Device: On the new or disposable VPS only, identify the installation disk (the example is
/dev/vda), then choose “Reformat”. This erases the selected disk, including any existing backup data; stop if you are unsure which disk it is.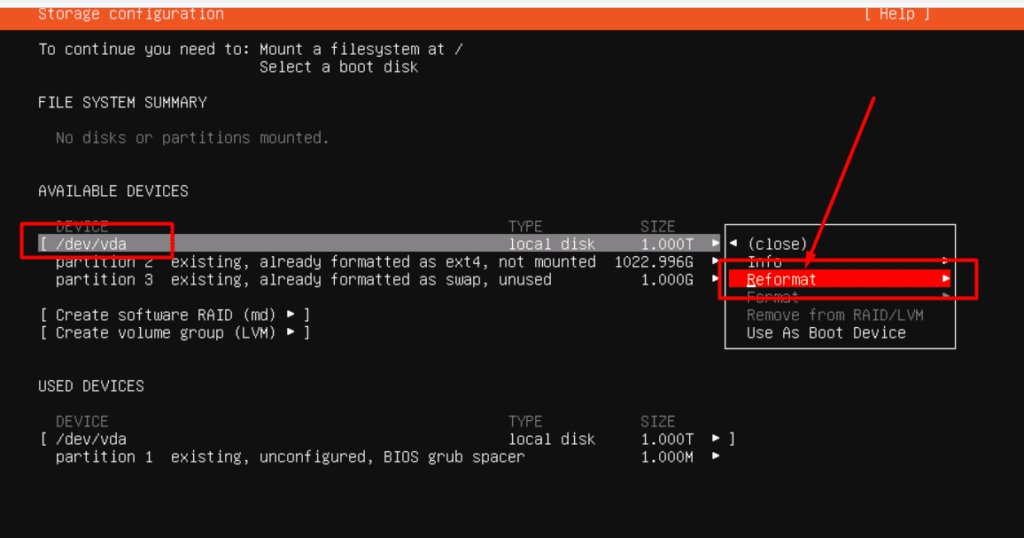
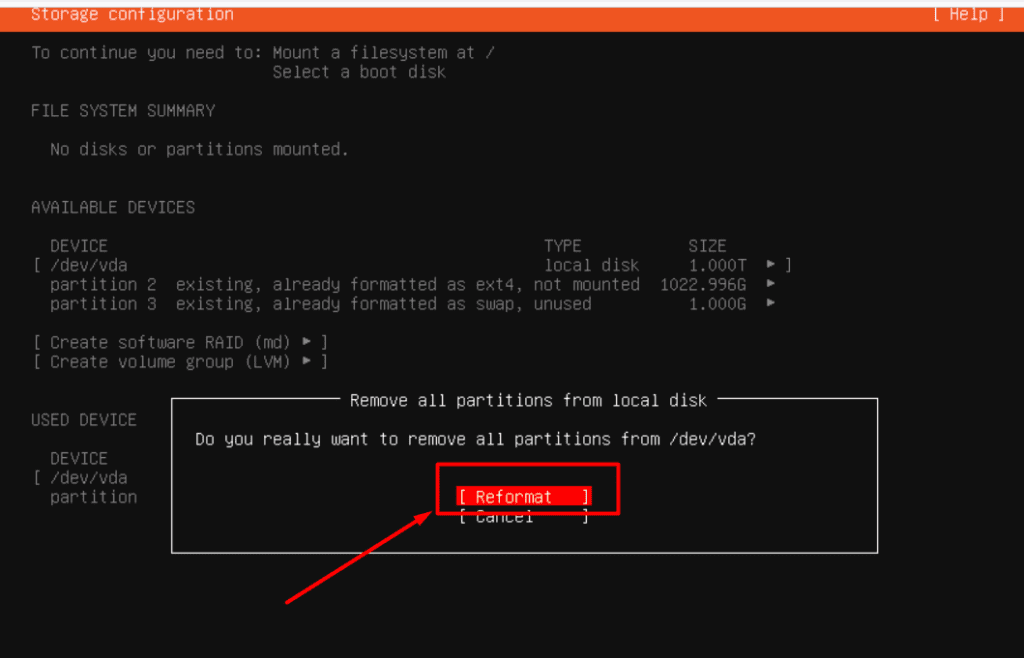
- Reformat Confirmation: Confirm reformatting (this will delete all partitions).
- Partitioning: You should now see the disk as free space. Select “Add GPT Partition” for
/, using60Gfor the example system partition. Adjust this to your needs, select Create, and press Enter.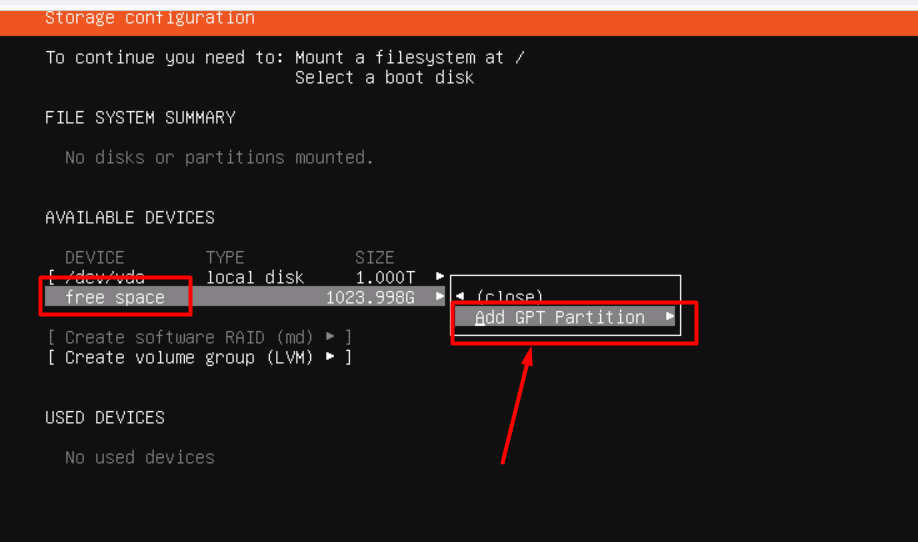
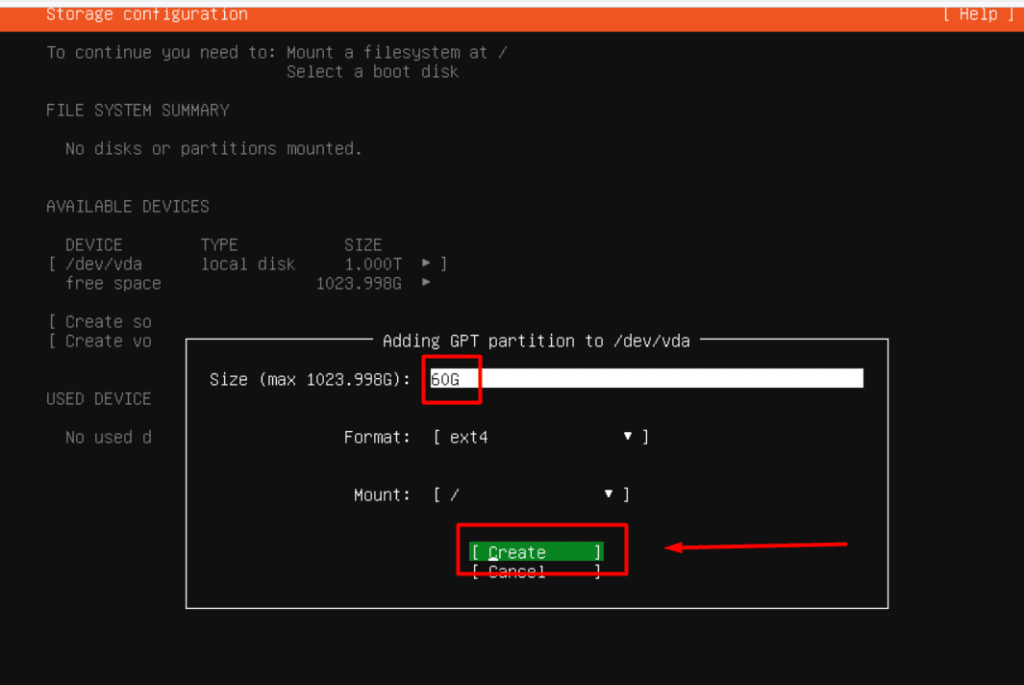
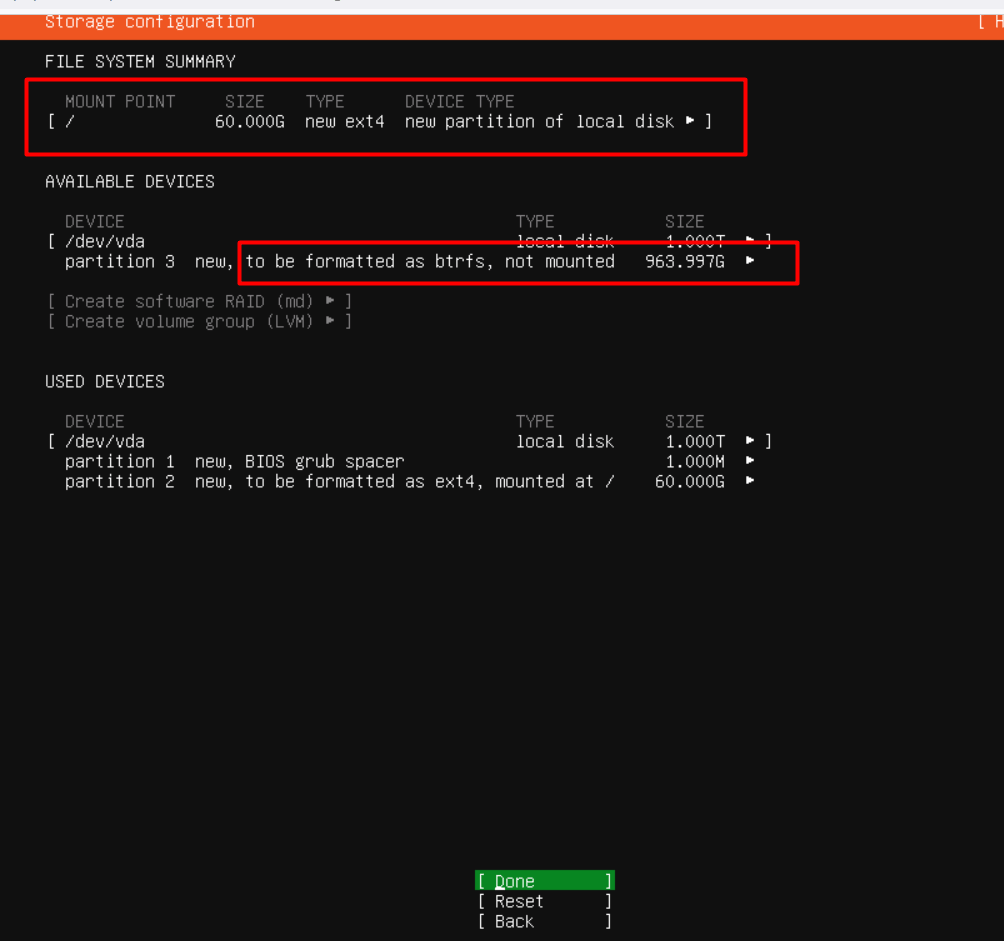
- Add the Backup Partition: The historical example added a second partition with the remaining space, formatted it as Btrfs and left it unmounted. For a fresh Enhance v12+ Ext4 setup, do not copy that Btrfs choice. Use a mounted Ext4 filesystem and a backup directory, following the current Enhance instructions linked above.
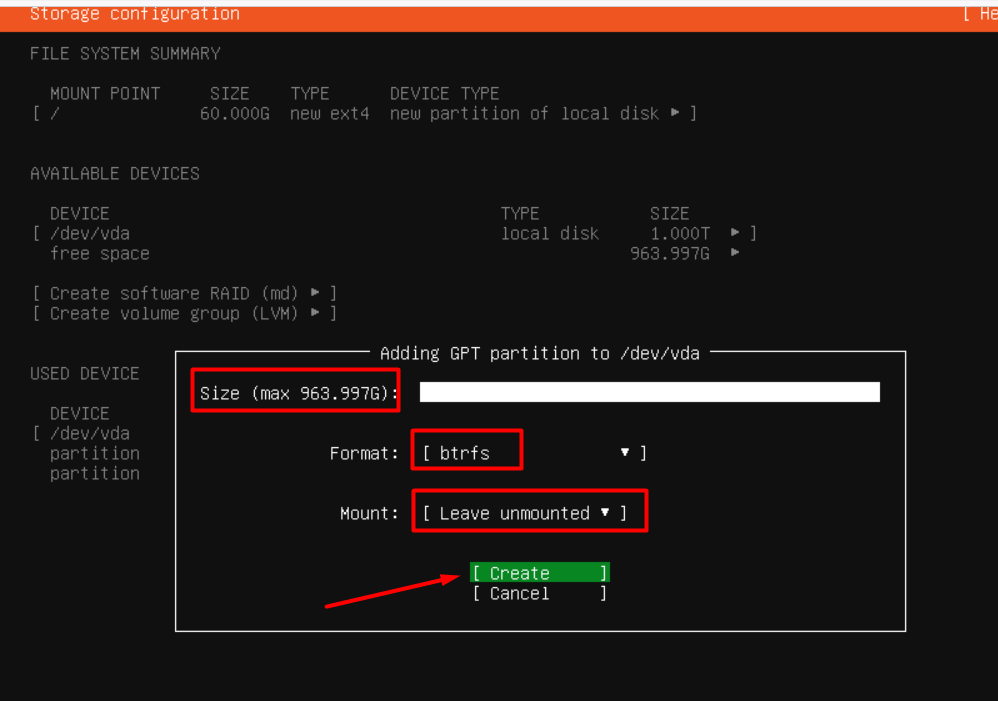
- Review and Confirm: Double-check your settings to ensure everything matches, then confirm.
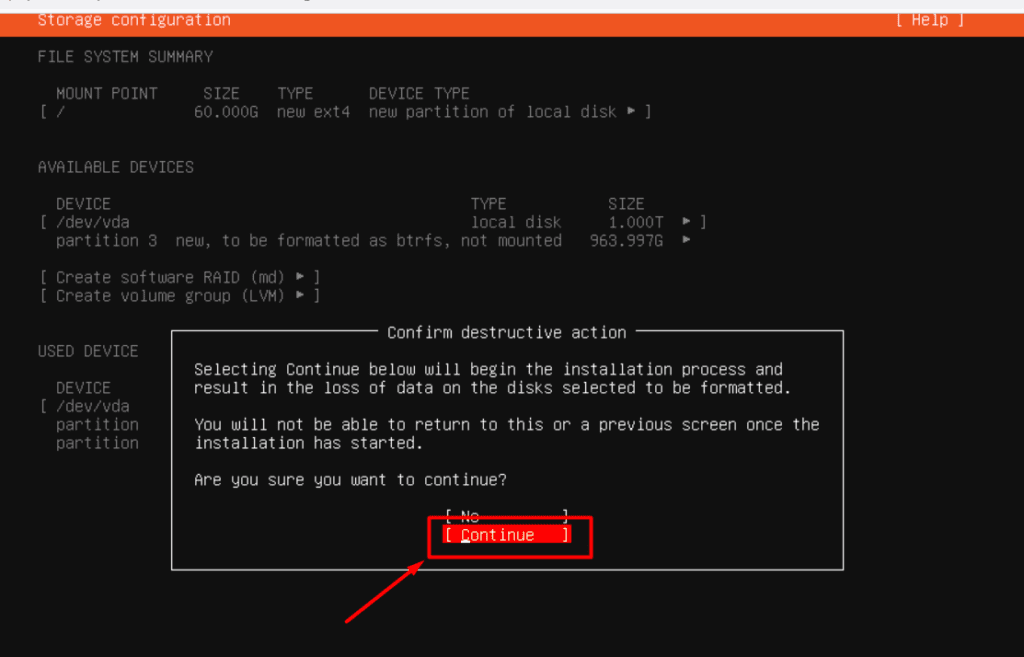
- Profile Configuration: Enter your details and make sure you save your username and password for future access.
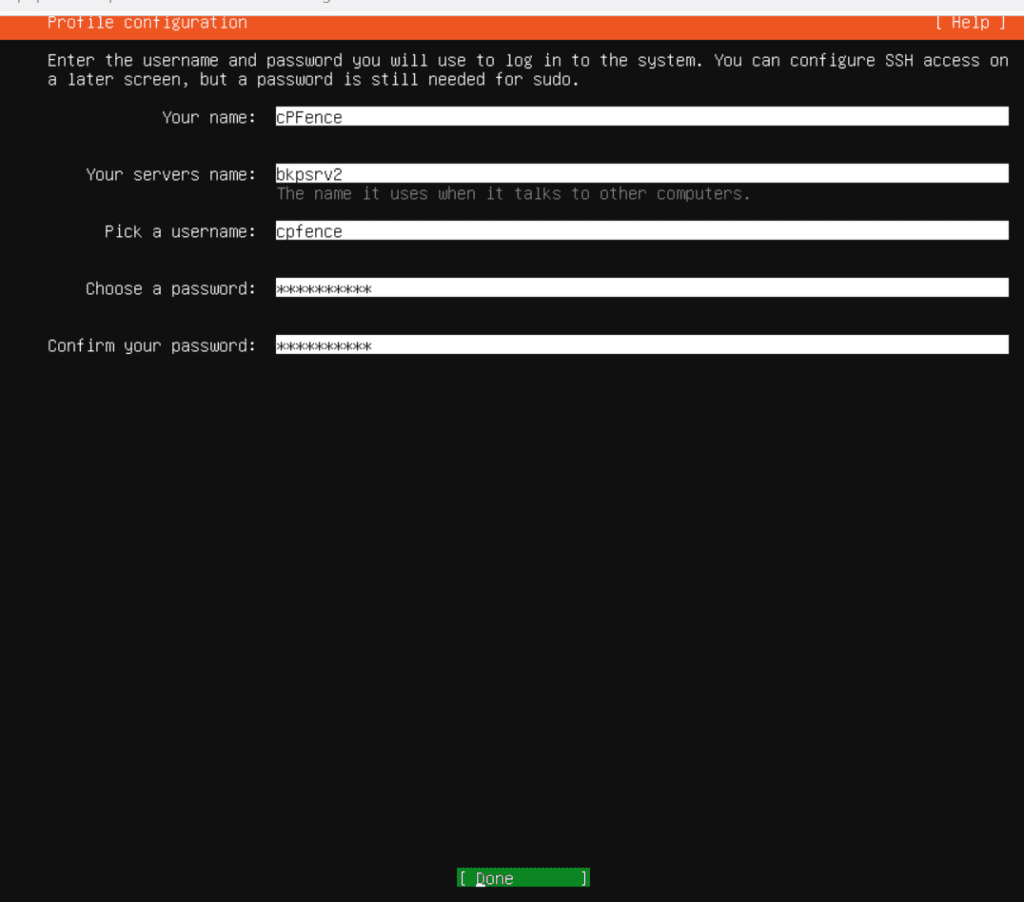
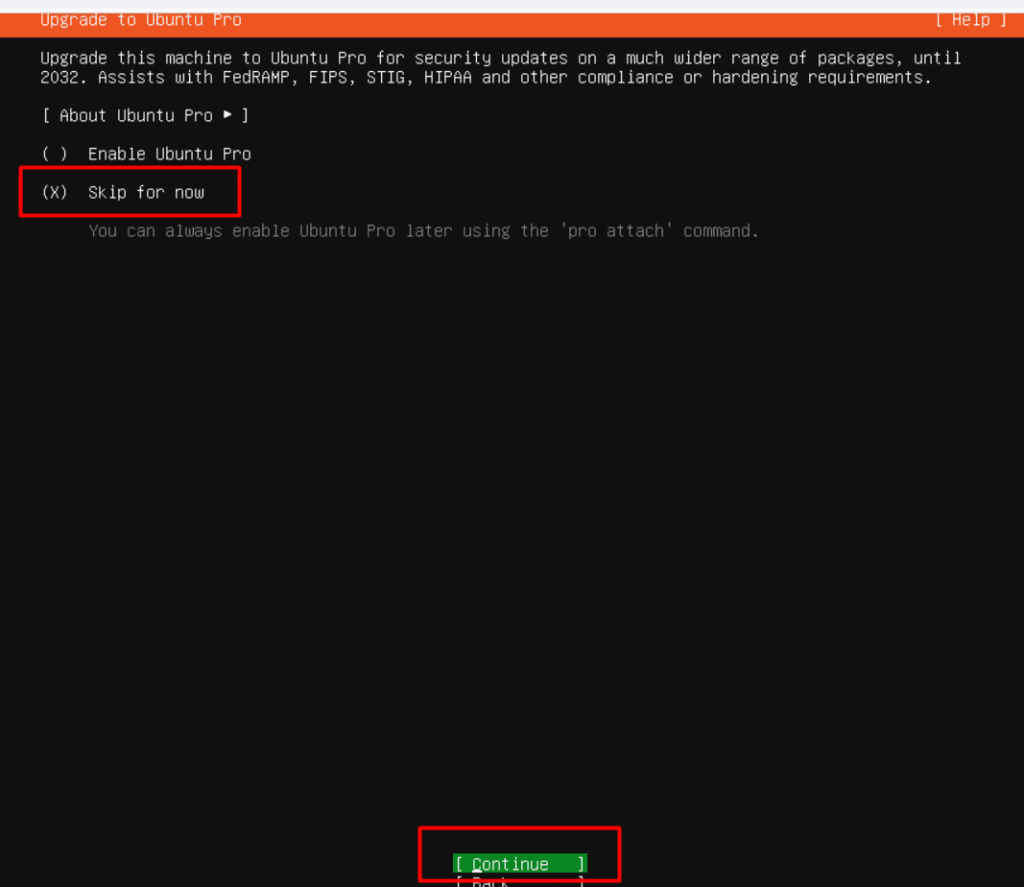
- Skip Ubuntu Pro: Choose “Skip for now” on the “Upgrade to Ubuntu Pro” page.
- SSH Configuration: Select “Install OpenSSH Server” to enable SSH.
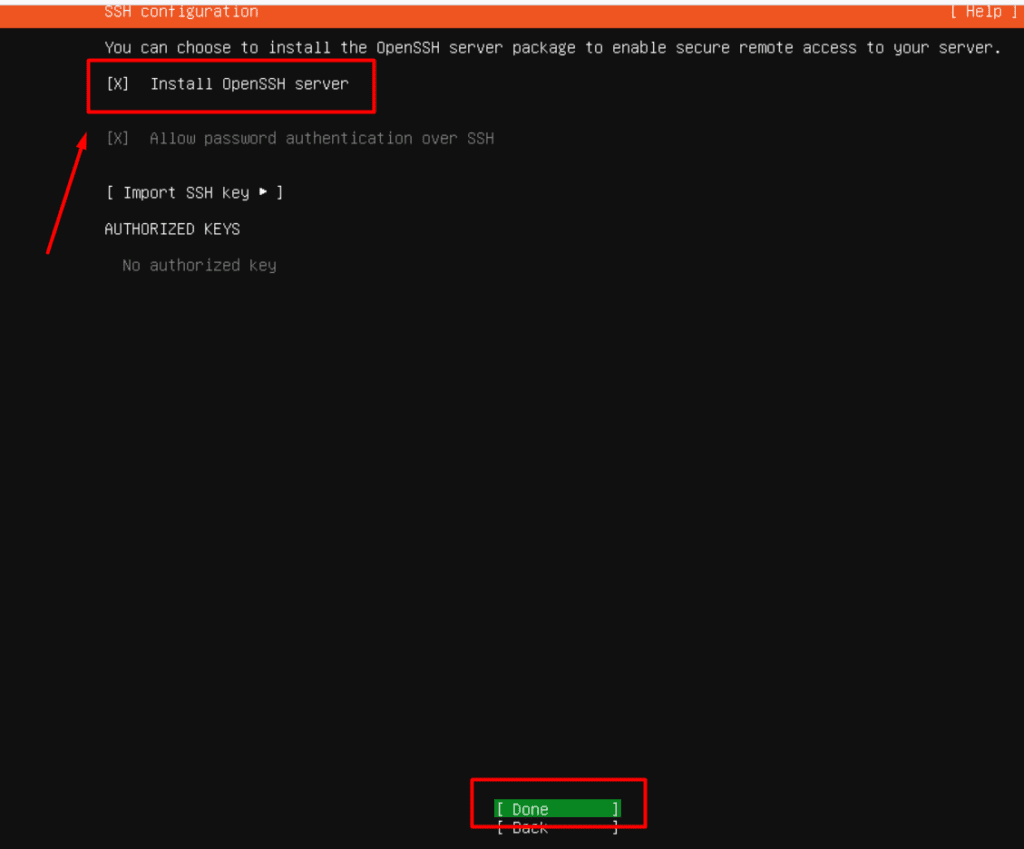
- Feature Server Snaps: Don’t select any options on this page and press Enter.
- Complete Installation: Wait for Ubuntu to install. When prompted, select “Reboot now.”
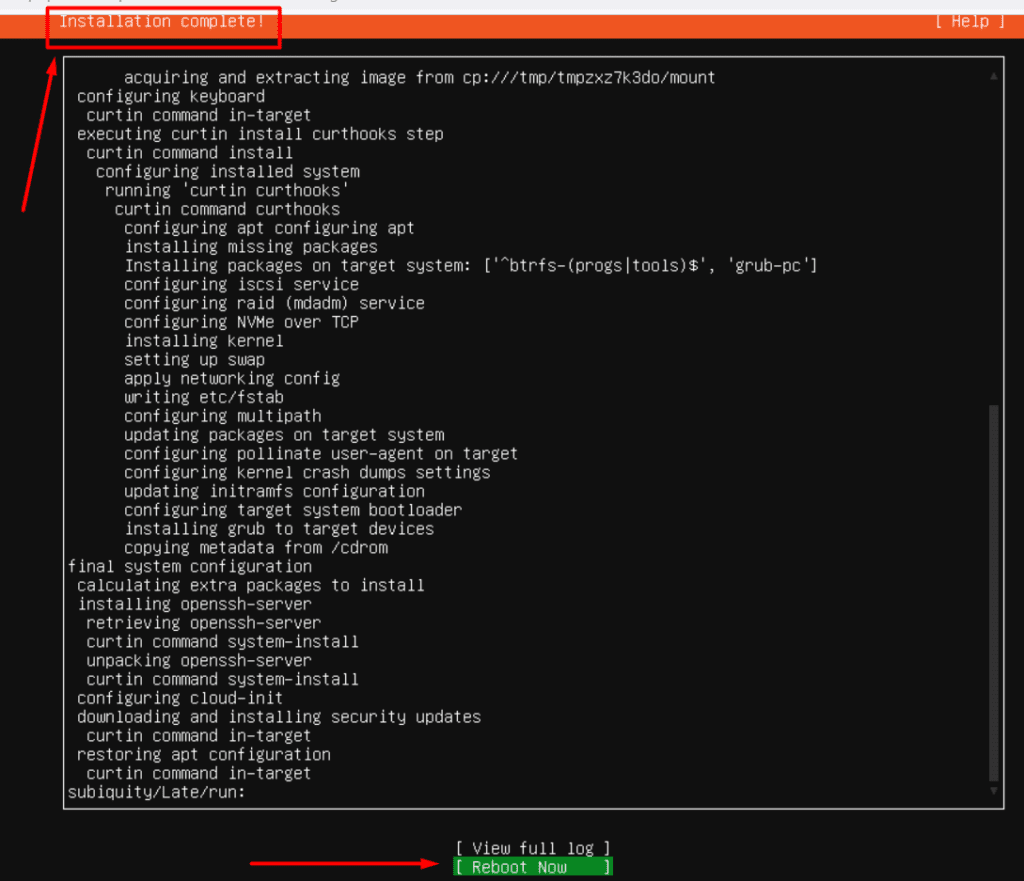
- Unmount the ISO: In the AlphaVPS client area, go to ISO and unmount it.
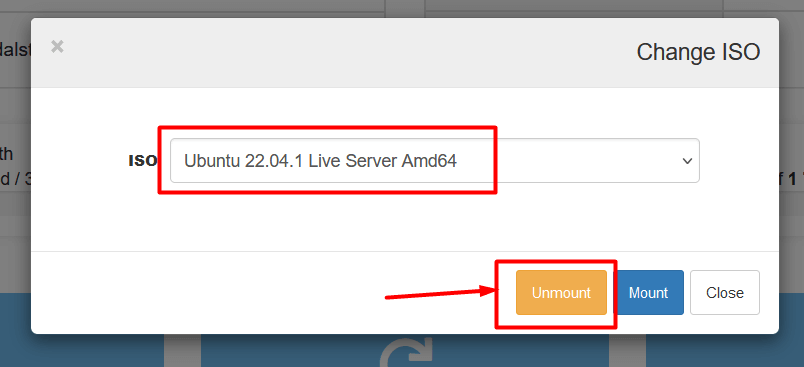
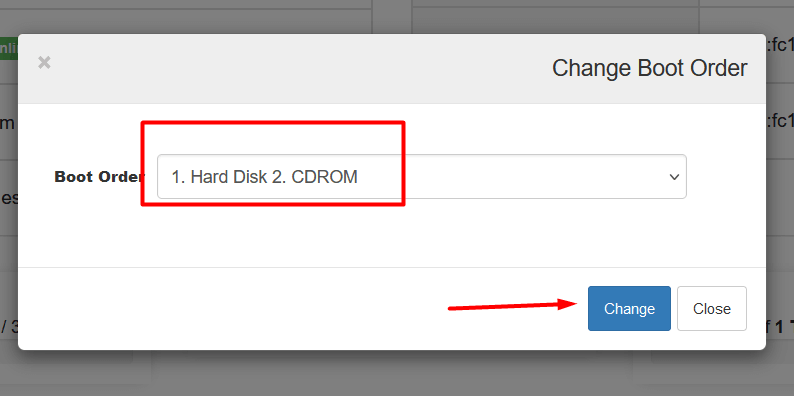
- Set Boot Order: Change the boot order to “1. Hard Disk 2. CDROM,” then reboot.
- Log In and Verify Partitions: Log in with the username and password you created. Confirm the partitions with the command below.
lsblk -f
The original Btrfs installation produced output like this. Your device names, identifiers and filesystem will differ; an Ext4 setup should not match the final Btrfs line:
root@bkpsrv2:~# lsblk -f

NAME   FSTYPE FSVER LABEL UUID                                 FSAVAIL FSUSE% MOUNTPOINTS

loop0                                                                0   100% /snap/lxd/22923

loop1                                                                0   100% /snap/core20/1587

loop2                                                                0   100% /snap/snapd/16292

sr0

vda

├─vda1

├─vda2 ext4   1.0         6c346889-3267-43aa-a967-c91f49ad34fa   50.5G     9% /

└─vda3 btrfs              8964c862-c31e-4cd6-9434-910e0db52248

root@bkpsrv2:~#
Recommended Optional Steps :
Administrator access and SSH keys
The original guide enabled root password login. That is unnecessary for Enhance backups: keep your normal administrator account and use sudo for privileged commands. Enhance’s backup transport uses public-key SSH authentication; it does not require root login or password authentication.
Keep a way back in: Save your working SSH configuration and confirm console access before changing authentication. Install your administrator’s public key and test it in a second connection before disabling passwords. Never copy your private key to the VPS.
Follow Ubuntu’s OpenSSH instructions. Review /etc/ssh/sshd_config.d/ as well as /etc/ssh/sshd_config: included settings can override edits to the main file, so the old one-line sed shortcuts are not reliable. Set PasswordAuthentication no in the effective configuration only after key access works, and keep public-key authentication enabled. Validate before restarting:
sudo sshd -t
# Continue only if the configuration check succeeds:
sudo systemctl restart ssh.service
Note: Add your SSH key before disabling password authentication to avoid being locked out! Keep the original session open while you test another login. If it fails, restore the previous configuration through that session or the provider console.
This administrator login is separate from passwordless inter-server SSH configured for cPFence. Normal cPFence v4+ operation does not need that setup; only MultiRun and remote WordPress backup/restore do. Enhance’s independent backup service still needs its own SSH transport.
Ubuntu updates and the older release-upgrade step
For a fresh server, install Ubuntu 22.04 or 24.04 directly when the provider offers it. Apply normal package updates and review the proposed changes:
sudo apt update
sudo apt upgrade
The original walkthrough upgraded a fresh Ubuntu 22.04 VPS to 24.04 after installation. If you still need that path, back up the VPS, check free space, keep console access and read Ubuntu’s release-upgrade instructions. Reboot for pending updates before the upgrade, then run:
sudo apt install update-manager-core
sudo do-release-upgrade
Review the offered target and proceed only with the planned Ubuntu 24.04 upgrade. The old -d flag can select a development release and is not appropriate here. Follow the upgrader’s prompts and reboot when it finishes. Do not leave the old example’s temporary TCP 1022 firewall opening in place; use a temporary, source-restricted rule only if the upgrader actually requests it, and remove it afterward. An existing Enhance server needs its own upgrade plan before changing the operating system.
Verify swap space
On systems with limited RAM, check whether swap is configured:
swapon --show
# Example only; your swap device and size may differ:
NAME      TYPE SIZE USED PRIO
/swap.img file   2G   0B   -2
An empty result means no active swap was listed. Check the provider’s setup and your workload before deciding whether to add it.
Ready to Back Up!
Once Ubuntu, access and storage are ready, add the server to Enhance and choose Add role → Backup. For the current flow, select the backup directory; the image below shows the historical Btrfs device form. Do not treat the device fields as current Ext4 instructions.
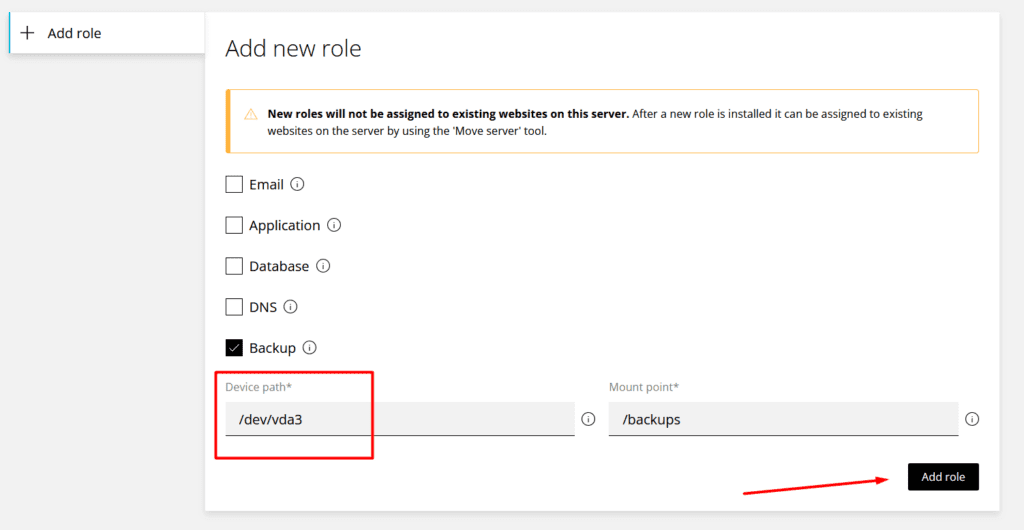
You can follow our Backup role walkthrough for the historical steps and current setup pointers. Assign the intended websites and check their completed backups before relying on the new server.
Protect Your Enhance Servers with cPFence
Add cPFence v4+ server protection alongside your Enhance backup plan. Explore the Pay-Per-Website option and choose what fits your setup.
Start free trial