New! Backup and Restore Individual WordPress Sites with Ease
If you’re running WordPress hosting with the Enhance control panel, you already know it provides reliable incremental backups out-of-the-box. But what happens when you only need to back up or restore a single WordPress website—not the entire hosting account?
Until now, this has been a frustrating limitation, especially for agencies, resellers, and hosting providers managing multiple WordPress installations within a single hosting account. We’re excited to introduce the brand-new cPFence WordPress Backup Module, designed specifically to solve this problem, giving you unparalleled control and precision at the individual website level—all managed effortlessly from one centralized dashboard.
Local backups and restores do not require passwordless SSH. Only remote WordPress backups/restore and MultiRun need it. For remote storage, each source server needs passwordless SSH to its backup destination. If you do not use those two features, you can disable passwordless SSH access and the rest of cPFence v4+ will keep working. See secure SSH access.
Why Choose cPFence WordPress Backup Module?
Managing backups and restores shouldn’t feel like a juggling act. cPFence simplifies the process, allowing you to protect and restore your WordPress websites seamlessly. Here’s what makes it stand out:
Key Features and Highlights:
1. Bulk or Single-Site Operations
Whether you’re backing up a single website, an entire server, or even your complete hosting cluster, cPFence has you covered. Manage everything smoothly through the intuitive, centralized cPFence WebUI—without complex scripting or manual intervention.
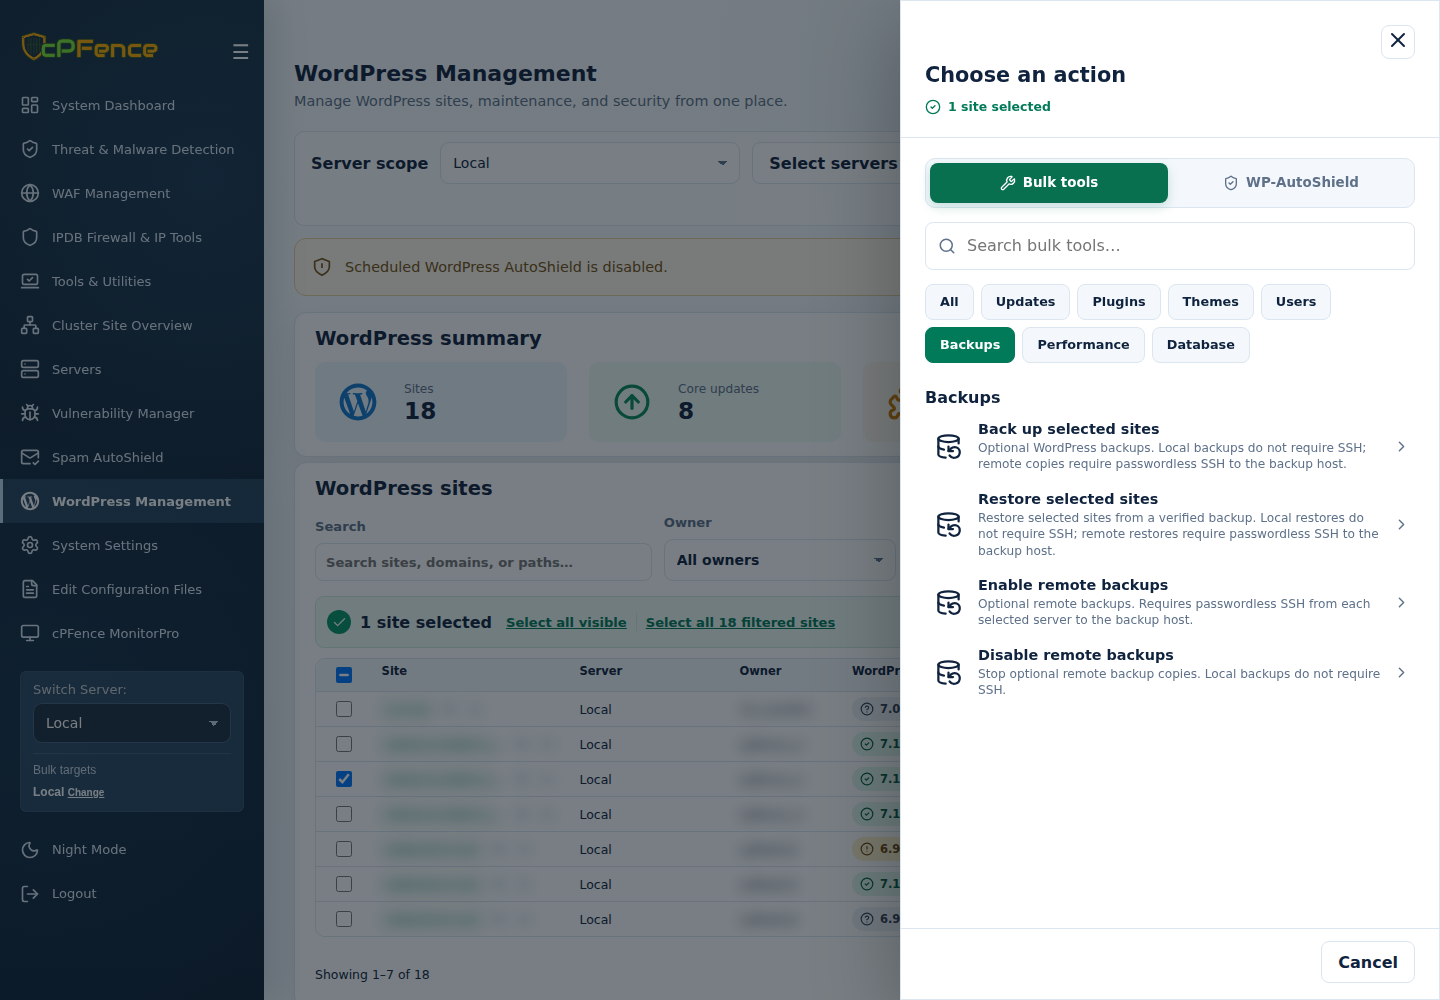
In WordPress Management, choose Server scope, filter and select the intended sites, then Choose action → Bulk tools → Backups → Back up selected sites. Review the sites and servers, confirm, and wait for every site’s final result. A snapshot needs both its file archive and database export plus verified completion; an archive alone is not enough. Local snapshots live under /cpf_wp_backups. Support users need Manage WordPress backups and site/server access.
2. Scheduled and Automated Backups
Take the guesswork out of backups by automating the entire process. Schedule backups daily or choose specific days according to your workflow. Your backups will run silently in the background, freeing up your time to focus on your business.
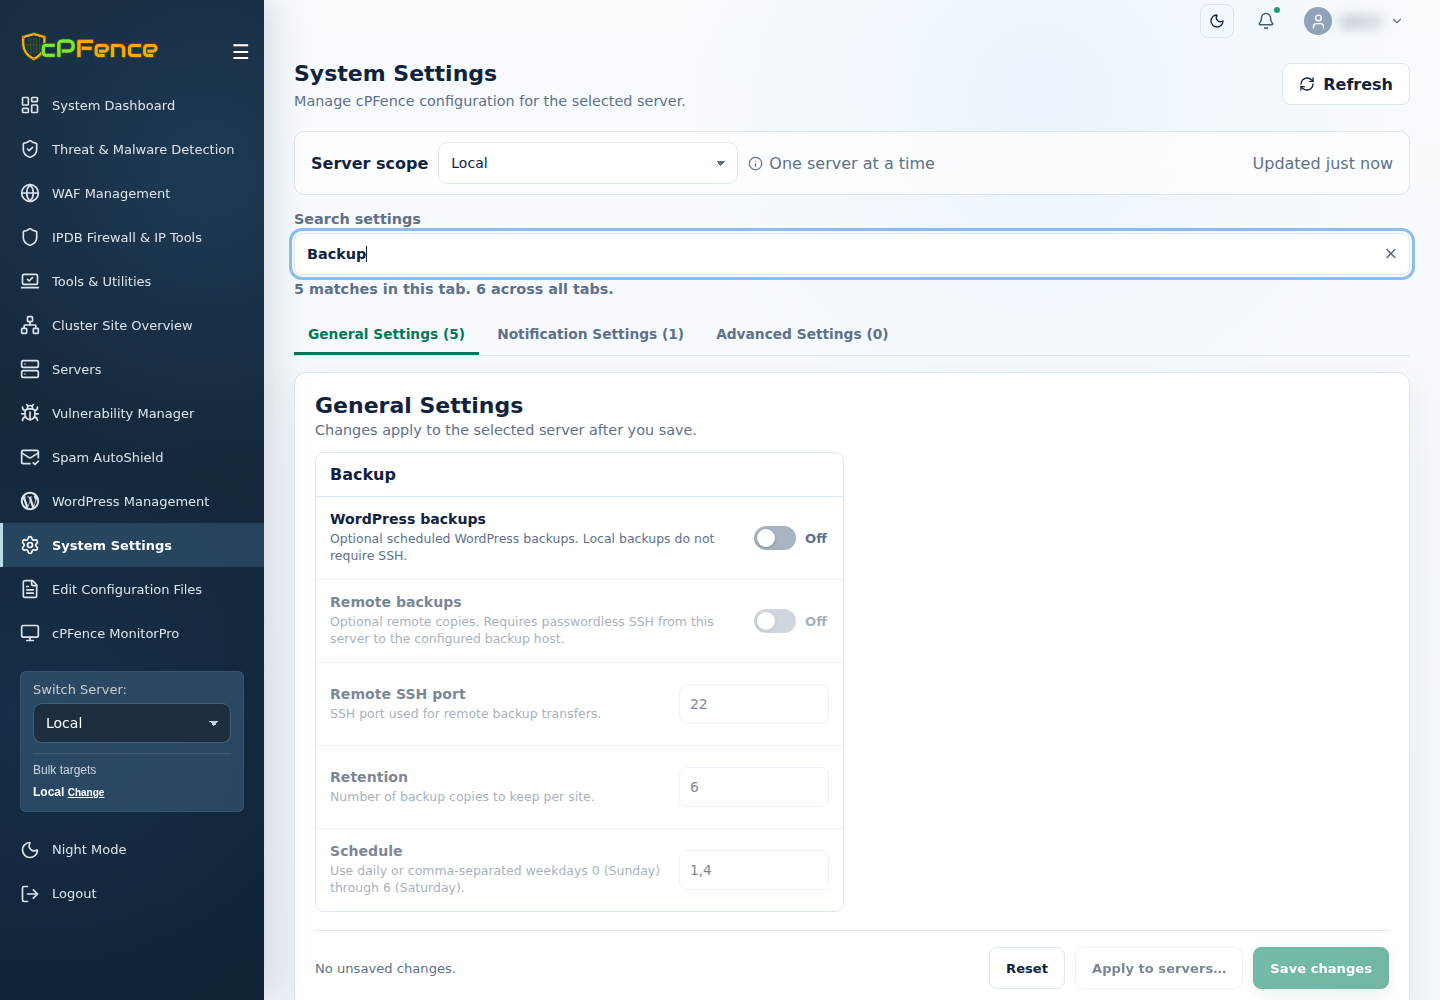
Use System Settings → General Settings, choose one server and find Backup. Enable WordPress backups, choose Schedule (daily or comma-separated weekdays 0–6, Sunday–Saturday), review Retention, then Save changes and check the result. Scheduled runs start at 4:10 AM server time on eligible days. Scheduled backups are off by default; manual selected-site backups remain available when scheduling is off.
3. Real-Time Email Notifications
Stay informed with instant email notifications. Receive detailed, actionable reports directly in your inbox, outlining the success or failure of each backup process, complete with logs for easy troubleshooting.
Enable the intended backup notification in Notification Settings and configure a working email or Slack delivery channel. Successful-backup notifications are off by default; enabling a switch does not by itself prove delivery.
4. Flexible File Exclusion Options
Not every file needs backing up, and cPFence lets you decide exactly what to exclude:
- Site-specific exclusions:
/var/www/{uuid}/.cpfence/cpfbackup-exclude.txt - Global exclusions:
/etc/cpfcli/backup/excludes.conf
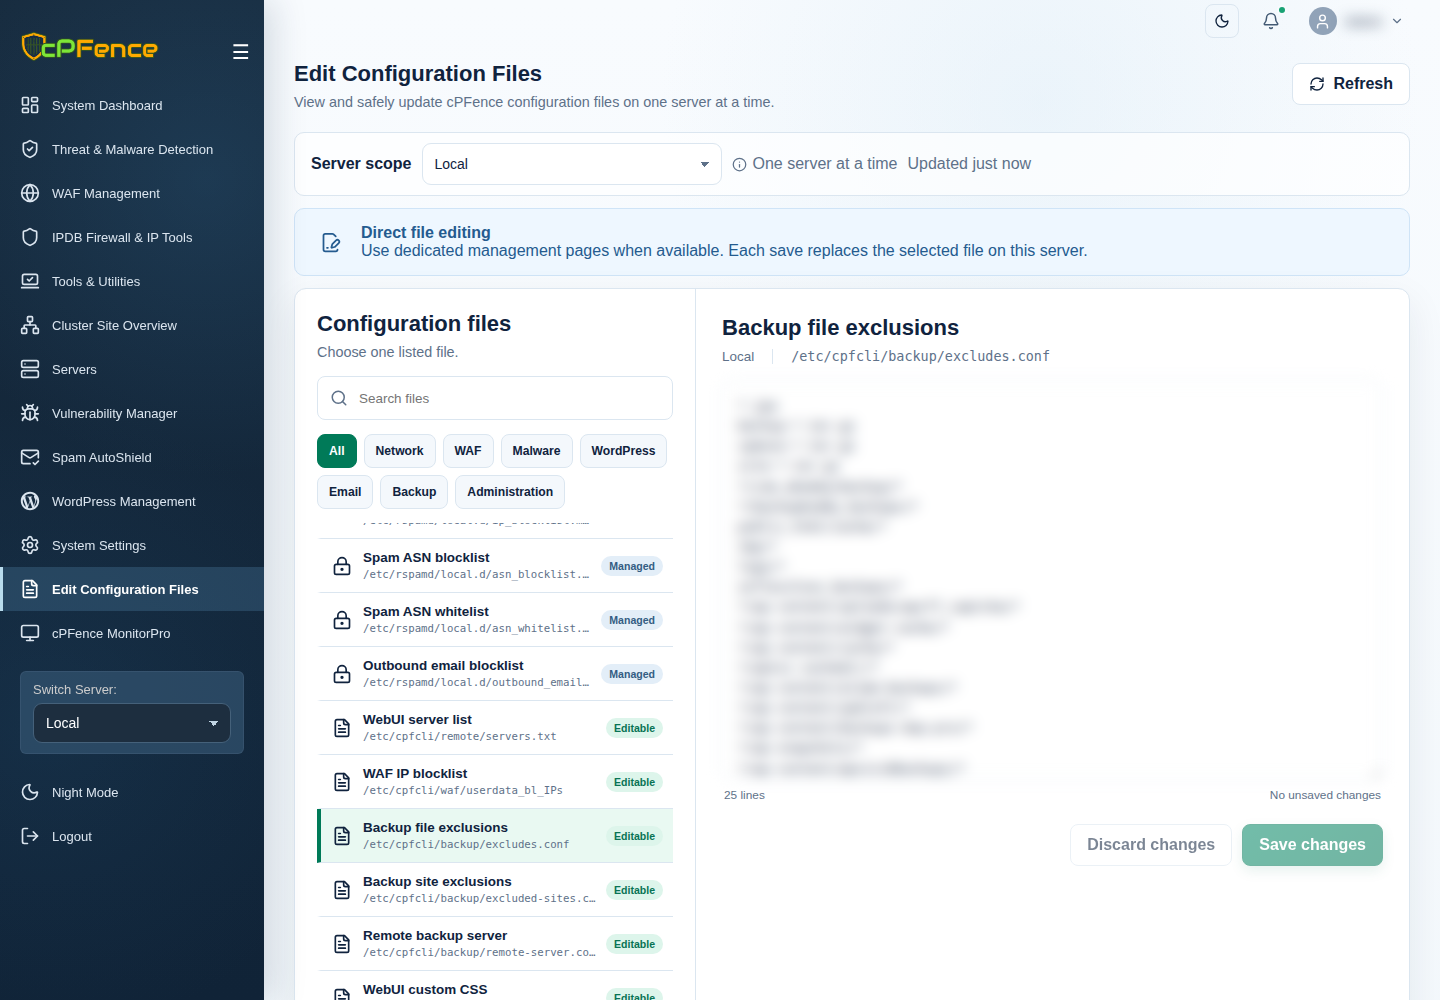
Tailor your backup strategy precisely, saving valuable storage space and bandwidth.
5. Intelligent Nested Site Detection
Automatically skips nested or duplicate WordPress installations to eliminate redundant backups, preserving both storage space and system resources.
6. Site-Level Backup Exclusions
Conveniently exclude specific websites from your backup schedule, helping streamline your backup strategy effortlessly. Simply edit:
/etc/cpfcli/backup/excluded-sites.conf
The WebUI exposes both lists under Edit Configuration Files → Backup file exclusions / Backup site exclusions. Preserve existing entries, save and reload. Check exclusions before relying on a backup; an excluded site creates no snapshot.
7. Remote Backup Storage
Extend your backup capabilities beyond local storage. cPFence supports secure off-site backups to remote servers via SSH, complete with custom port settings. Enhance your disaster recovery strategy and ensure data safety with off-site storage.
Choose Enable remote backups in the Backups category, enter the Remote backup host as user@host, then Review action. This changes storage for all discovered WordPress sites in the server scope, rather than just checked rows. Check the target servers before confirming. Set the destination port in System Settings → Remote SSH port and prepare SSH keys and approved host identity from each source server to the backup destination.
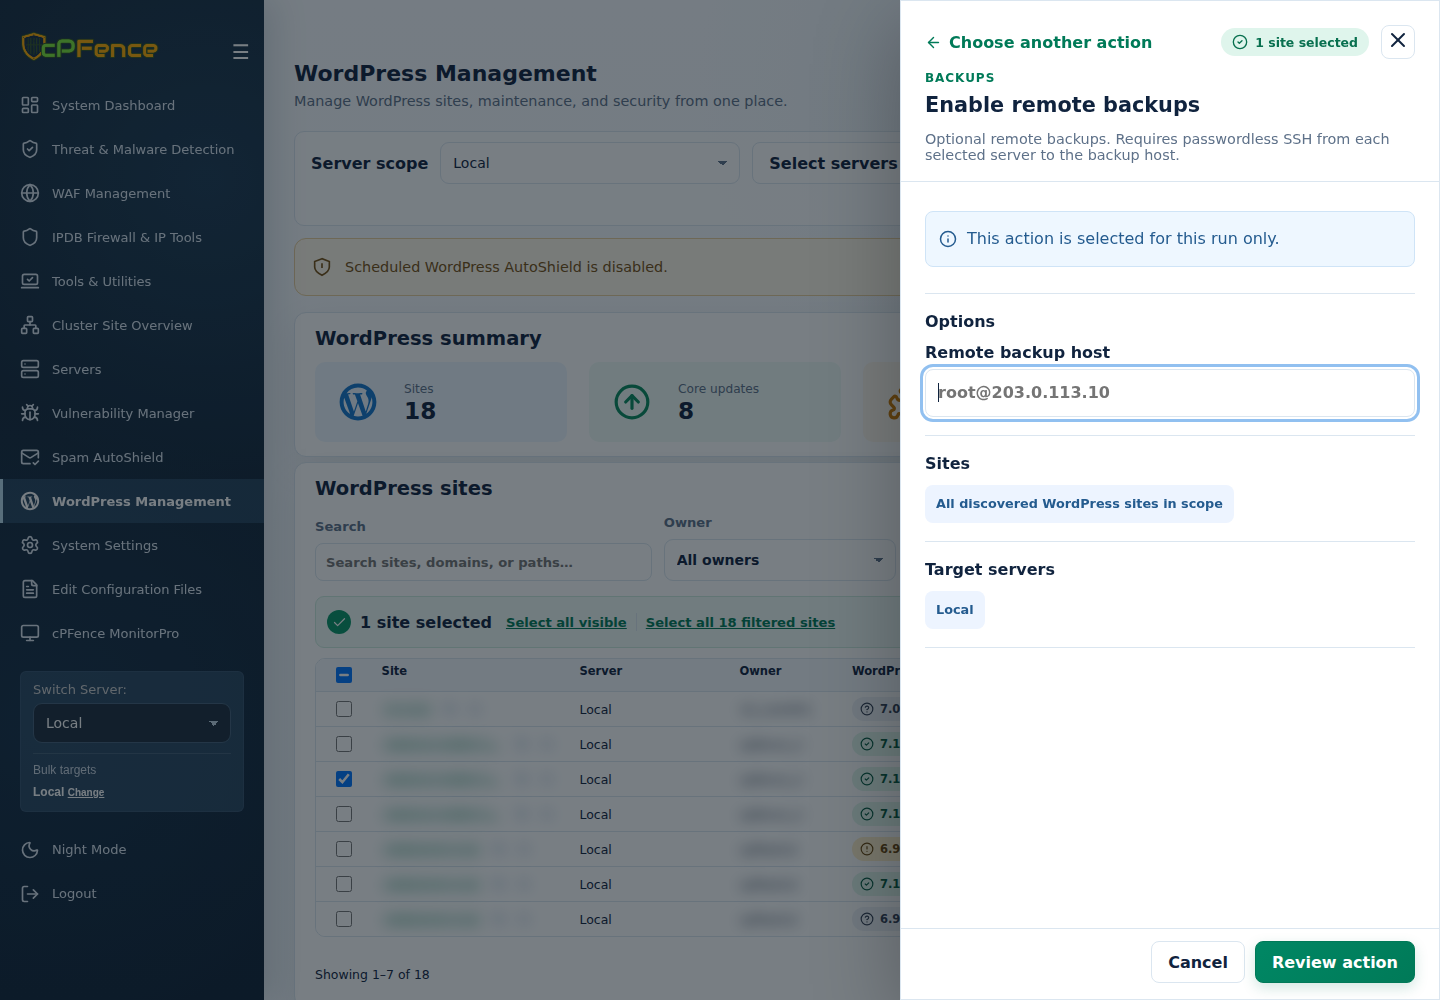
Verified remote transfers remove the local copy, so check the reported remote location and complete snapshot. Disable remote backups changes future storage; it neither deletes remote snapshots nor downloads them locally. Check destination space, SSH access and port if a transfer fails.
8. Snapshot-Based Restores
Mistakes happen—but with cPFence, recovery is easy. Restore any WordPress installation swiftly from a specific snapshot date, minimizing downtime and ensuring rapid disaster recovery.
Restore replaces the selected sites’ files and databases. Save current data and choose a maintenance window first. Select the sites and open Restore selected sites; choose the verified Backup date and optional Time (HH-MM-SS). If more than one snapshot matches the date without a time, the oldest timestamp is selected. Review the exact targets and timestamp, confirm, then inspect each result and test public pages and administrator sign-in before reopening the sites.
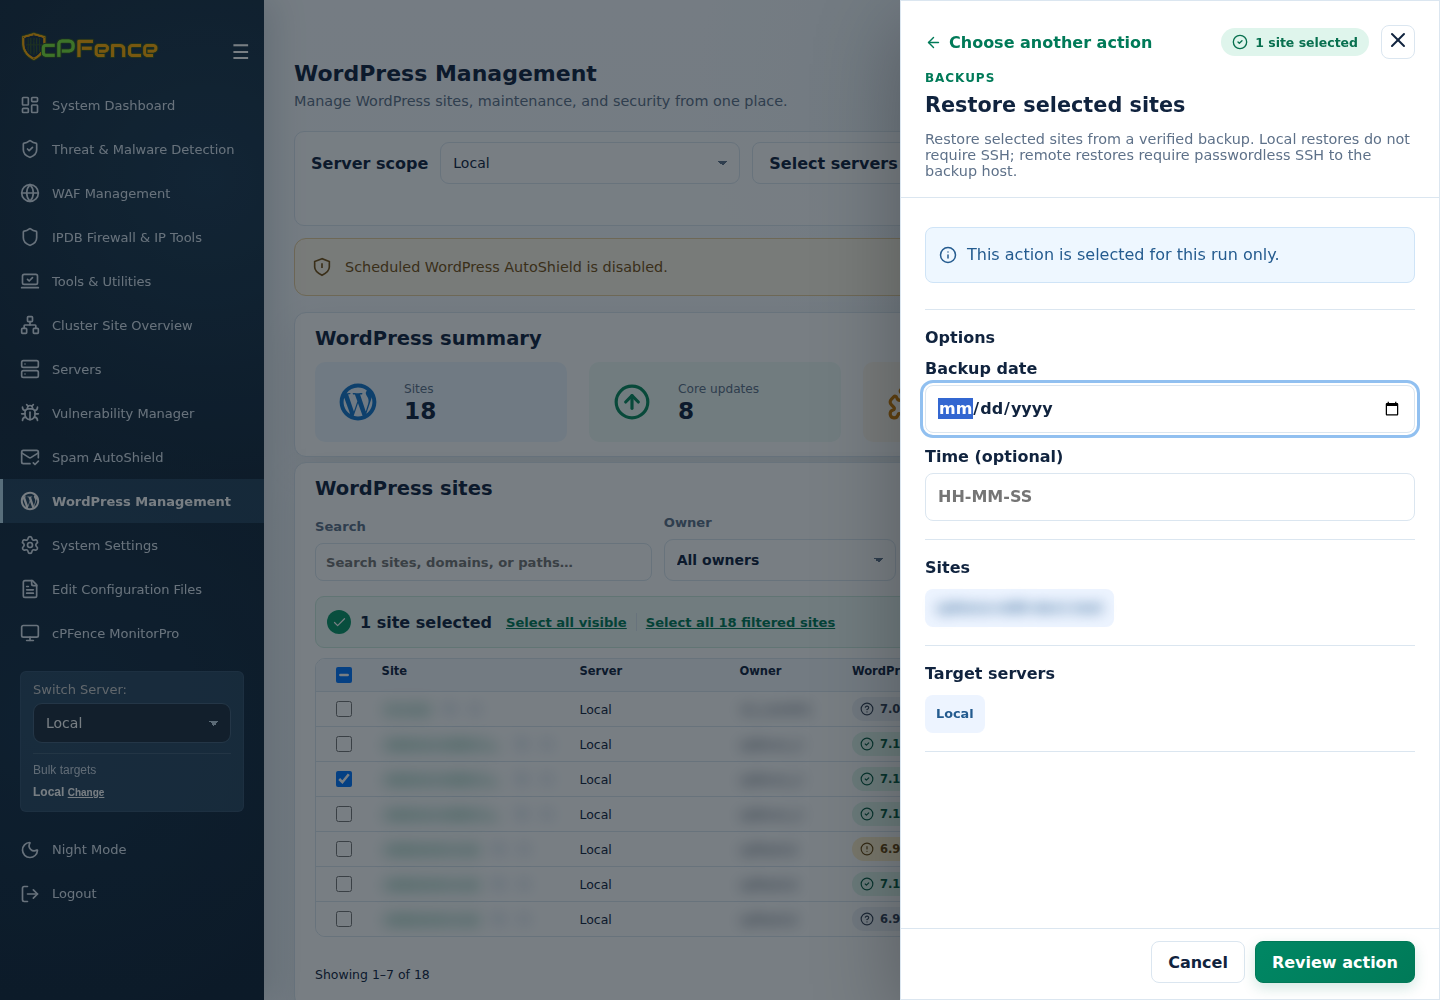
Missing or corrupt pairs are rejected. If restore or rollback fails, preserve the reported logs and recovery data and resolve it before trying again. See backup and recovery details.
9. Customizable Retention Policies
Easily set retention policies at the server level to maintain efficient storage usage and compliance. Control exactly how many backup snapshots you want to retain, automatically managing older snapshots to avoid storage overflows.
The packaged retention is 12 snapshots per site; review your saved choice before reducing it. Retention processing applies the limit during backup work, not as an immediate purge when saving settings.
10. One-Click Backup Initiation
Start backups instantly from your WebUI dashboard with just a single click. No delays, no complexities—just efficient, reliable backups when you need them.
Prefer Command-Line Interface (CLI)?
While the cPFence WebUI offers unmatched ease of use, we also cater to users who prefer command-line control. Everything is mirrored via straightforward CLI commands:
cpfence --cpf-backup-cron-on        # Enable scheduled backups
cpfence --cpf-backup-cron-off       # Disable scheduled backups
cpfence --cpf-remote-backup-on      # Enable remote backups (prompts for remote server details)
cpfence --cpf-remote-backup-off     # Disable remote backups, use local storage
cpfence --bulk-backup-wp-sites      # Initiate backups for all WordPress installations
cpfence --bulk-restore-wp-sites     # Restore WordPress installations from specific snapshots
Run CLI commands as root on the intended server. WebUI selections do not set CLI targets. Restore also accepts cpfence --bulk-restore-wp-sites YYYY-MM-DD or cpfence --bulk-restore-wp-sites YYYY-MM-DD_HH-MM-SS; choose the verified snapshot and read the prompts before proceeding.
Whichever method you prefer, cPFence adapts seamlessly to your workflow.
Ideal for Agencies, Resellers, and Hosting Providers
The cPFence WordPress Backup Module is designed to streamline operations specifically for hosting companies, digital agencies, developers, and IT managers. It removes manual workloads, automates tasks efficiently, and provides granular backup control that’s essential for managing multiple websites across complex infrastructures.
With zero scripting required, the cPFence backup module transforms how you manage backups—making complex tasks straightforward and reliable.
How to Get Started?
Getting started with cPFence WordPress Backup Module is easy. You can activate backups directly from your central WebUI dashboard with just a couple of clicks, or if you prefer using the CLI, simply execute these commands:
cpfence --cpf-backup-cron-on        # Enable scheduled backups
cpfence --cpf-remote-backup-on      # Enable remote backups (you'll be prompted to enter remote server details)
Note: Only the optional remote WordPress backup/restore flow and MultiRun require passwordless SSH. Establish it from each source server to the remote backup host before enabling remote storage. For local-only backups, leave Remote backups off and skip cpfence --cpf-remote-backup-on; you can disable passwordless SSH access and other cPFence v4+ features will keep working.
That’s it—your WordPress backups are now fully automated and secured.
Try cPFence Today—No Risk, Just Results
Ready to revolutionize your WordPress backup and restoration process? Experience the power of precision backups, intuitive management, and simplified restores. Simplify your backups. Strengthen your business.
Start free trial