cPFence MonitorPro®: One-Click Uptime and Keyword Monitoring

Security and uptime go hand in hand. In the world of web hosting, monitoring your websites is essential to stay ahead and be the first to know when something goes wrong. If you’re serious about your hosting business, you need a reliable uptime monitoring solution running 24/7. That’s where cPFence’s new MonitorPro Module steps in.
Setting up SaaS monitoring services or an in-house solution can be time-consuming and costly, not to mention the hassle of keeping the monitored list up-to-date. Adding and removing clients as they come and go? Total headache.
But with cPFence MonitorPro, those days are over. Say hello to one-click website and keyword monitoring tailored for your hosting business. Here’s why MonitorPro is a game-changer:
One-Click Monitoring Activation
Getting started with MonitorPro is as easy as flipping a switch. Just run the command:
cpfence --monitorpro-on
And you’re good to go! From that moment, MonitorPro automatically keeps track of your websites, adding new clients and removing canceled ones in real-time—24 hours a day, seven days a week.
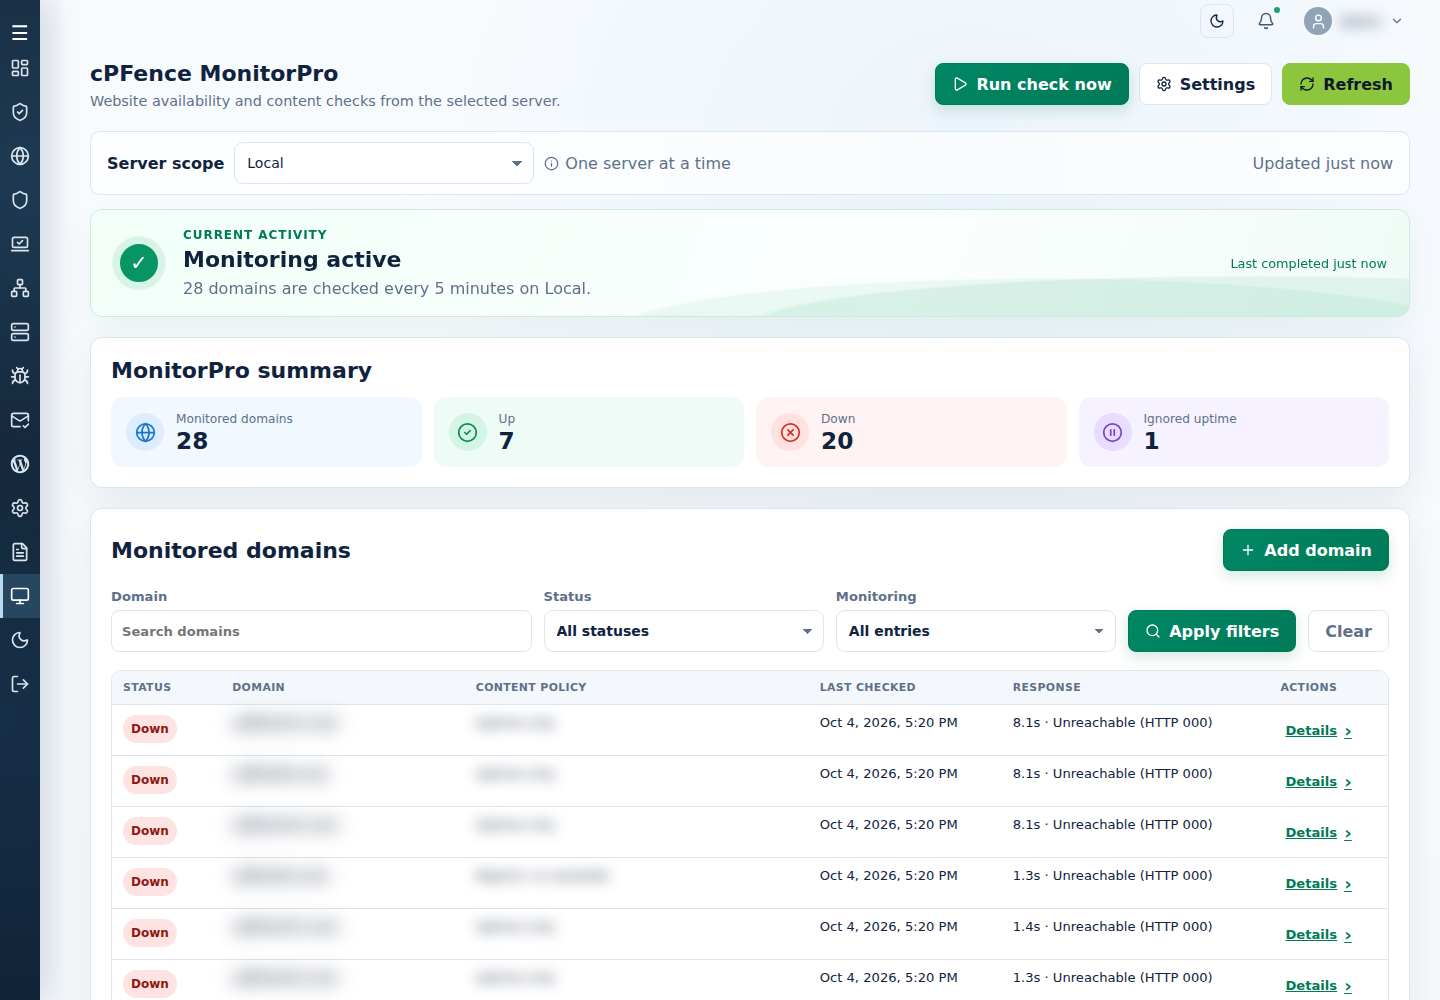
Prefer the WebUI? Open MonitorPro and start with Local, the main control panel server, where Enhance’s cluster domains are imported automatically. Open Settings, enable MonitorPro website monitoring, review Concurrent checks, then save and check the result. Enabled scheduling runs Every 5 minutes; manual checks remain available while scheduling is off.
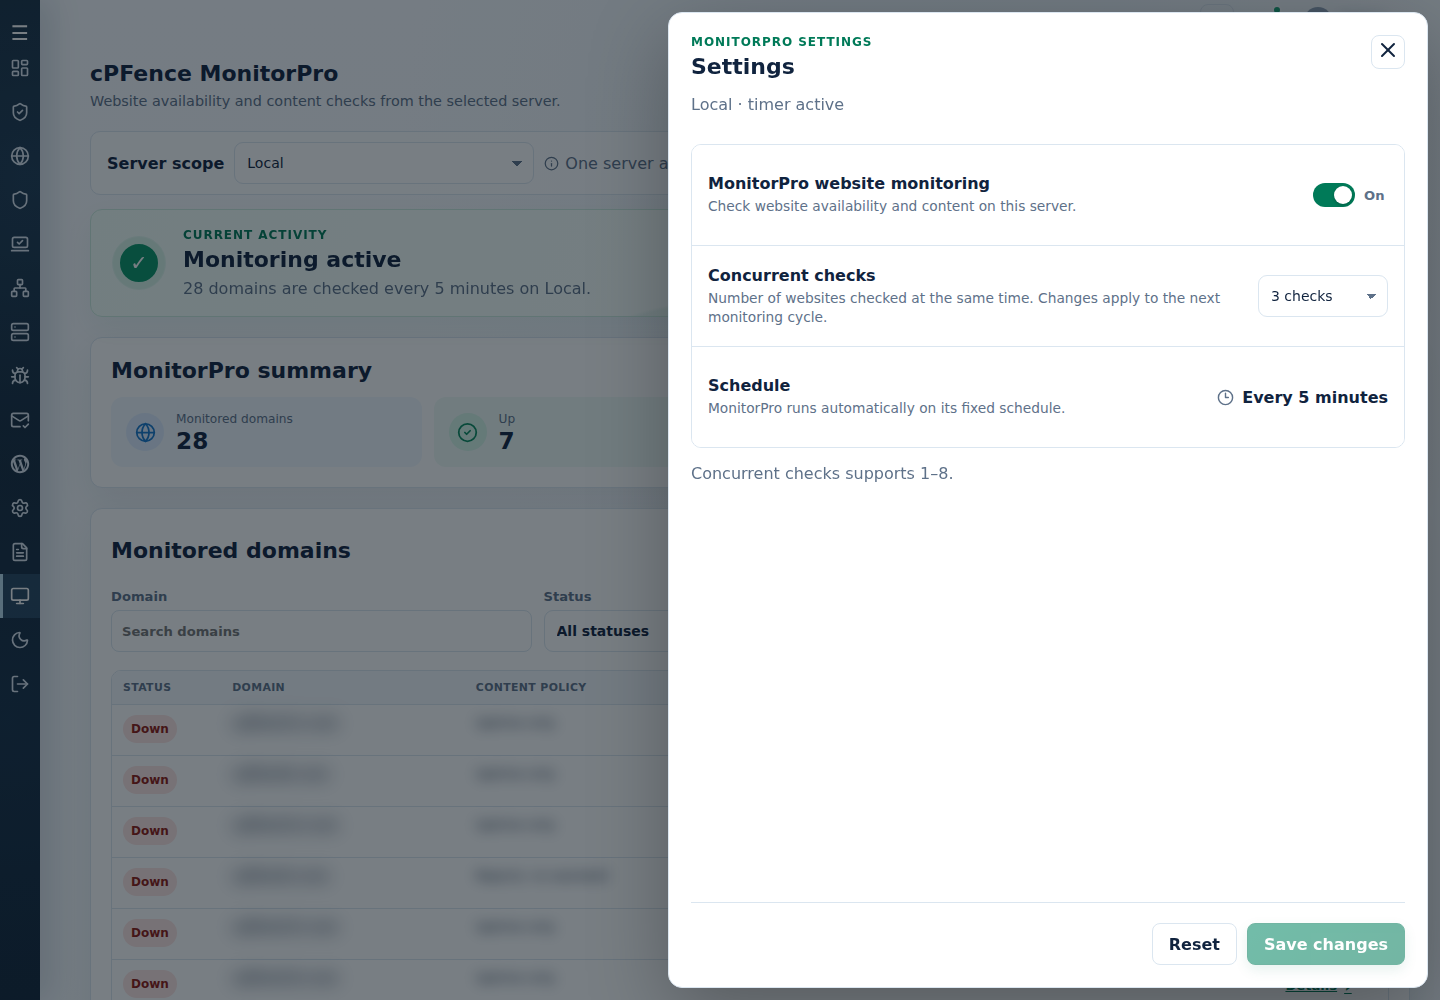
Want to tune parallel checks from the terminal? As root on the checking server, cpfence --monitorpro-workers 3 sets three concurrent checks. The supported range is 1–8; choose a value with spare capacity and inspect the command’s result. It is not a count of monitoring locations.
Got domains outside your cluster? MonitorPro has you covered. Want to skip monitoring specific domains? No problem, simply mark them as excluded.
Intelligent Keyword Monitoring
MonitorPro doesn’t just check if your websites are up. It also allows you to monitor specific content on your websites. Whether you need to ensure certain keywords are present (or absent), MonitorPro can handle it all. With customizable CSV-based settings, you can:
- Add required keywords to verify they’re always visible.
- Specify not-wanted content to flag any issues immediately.
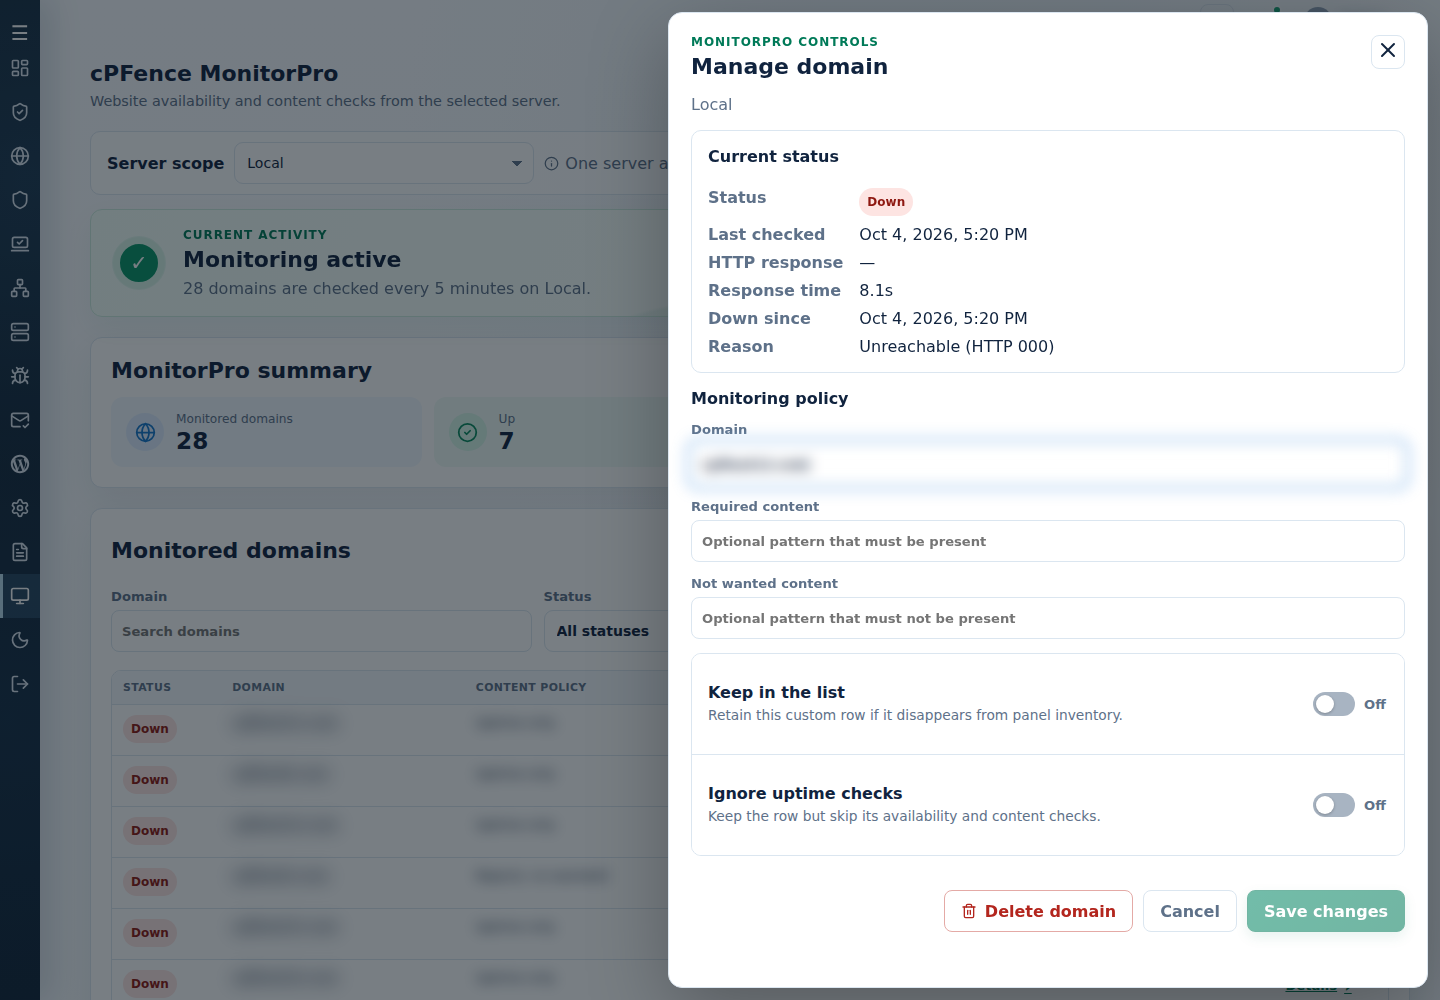
In the current WebUI, use Add domain, or a row’s Details ›, to set Required content and Not wanted content. Choose a stable marker from the page the checking server receives—CDN challenges and login pages can change that response. Save and review the policy, then check the actual outcome. These are case-insensitive basic regular-expression patterns; simple text is a good starting point.
On-Demand Cluster Scanning
Need a quick health check for all your cluster sites? MonitorPro has your back. Just run:
cpfence --monitorpro-scan-status
This command provides a comprehensive status update, helping you identify and resolve issues instantly.
From the WebUI, use Run check now on the selected checking server and review the confirmation. Follow its activity, then inspect the final result and each domain’s Last checked and response. Refresh reloads records; it does not run a new check. Unknown, ignored or incomplete is not a successful availability result.
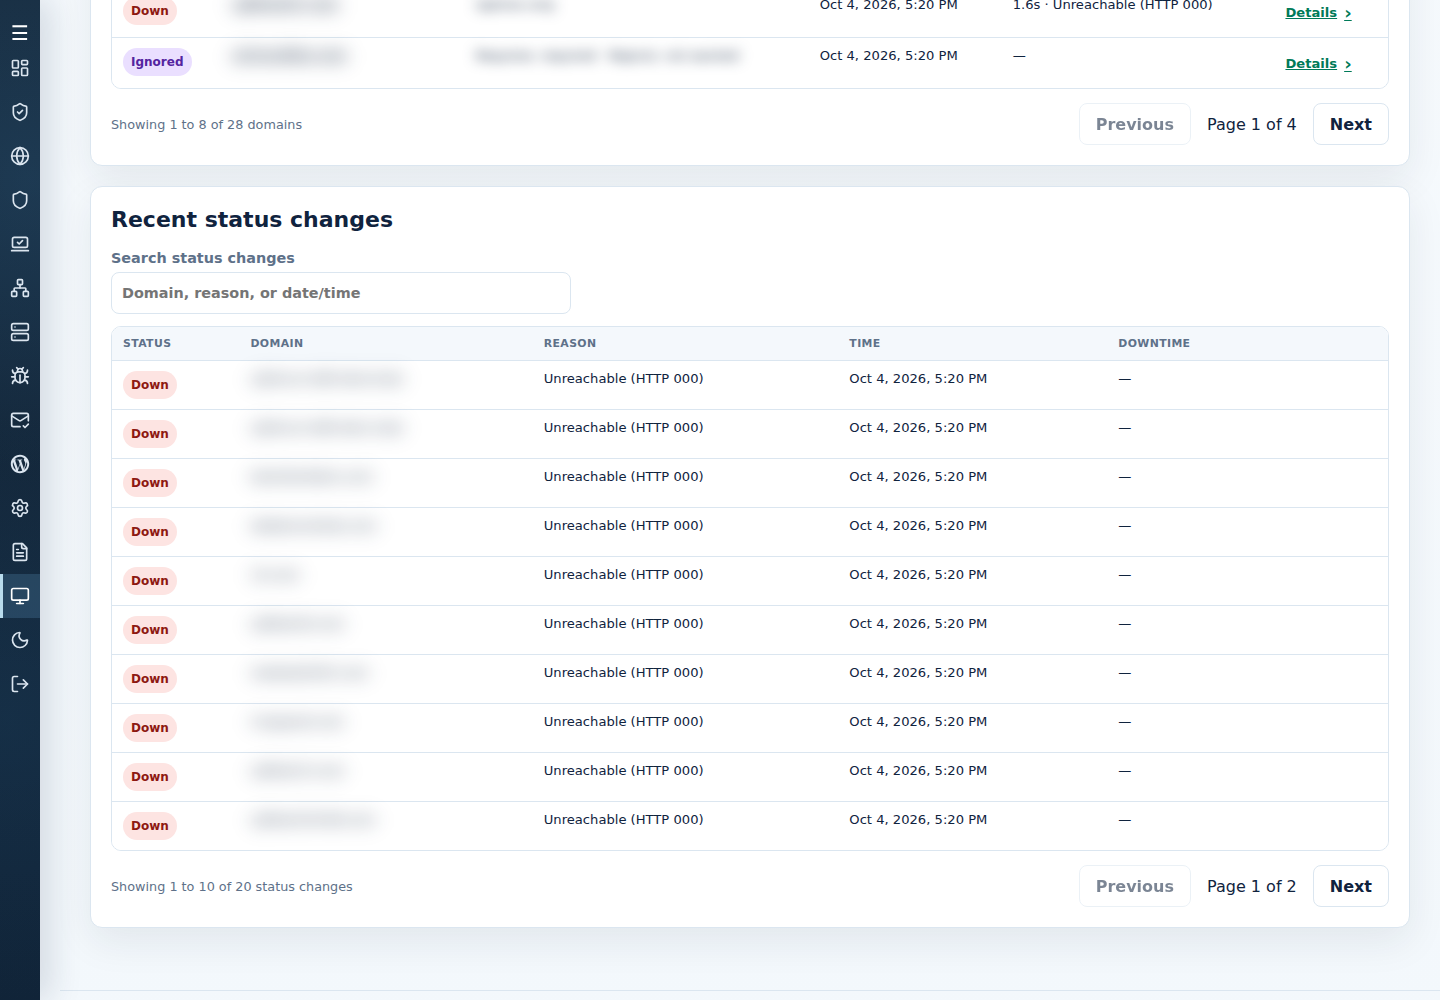
Want to look back at an outage? Scroll to Recent status changes, search by domain, reason or date/time, and use Previous and Next to browse retained transitions.
Multilocation Monitoring Made Easy
With MonitorPro, you can set up multilocation monitoring nodes effortlessly. Use your own servers to monitor websites from different locations for added reliability. Here’s how:
- Export your cluster domains:
cpfence --export-cluster-domains - Transfer the domain list to another server with cPFence installed.
- Start monitoring from multiple locations in no time.
Local is the simplest starting location for your Enhance cluster. Secondary servers are optional additional checking locations, each with its own domains, settings and history. Review the intended scope before importing or editing a list; a saved list is not proof of a completed check.
Zero Impact on Performance
The best part? MonitorPro operates with zero footprint on your CPU and RAM, even while running checks. You won’t even notice it’s there.
How to Add Domains and Customize Monitoring
For the WebUI route, select the checking server and use Add domain. Keep Keep in the list on for an external target, choose any content policies, and save. To skip a domain without losing its row, enable Ignore uptime checks; it skips both availability and content checks. Deleting a panel-managed domain may be temporary because inventory can add it again.
Running cPFence on a non-control panel server? No worries. Just download the sample file from: https://api.cpfence.app/monitor-sites-list.csv
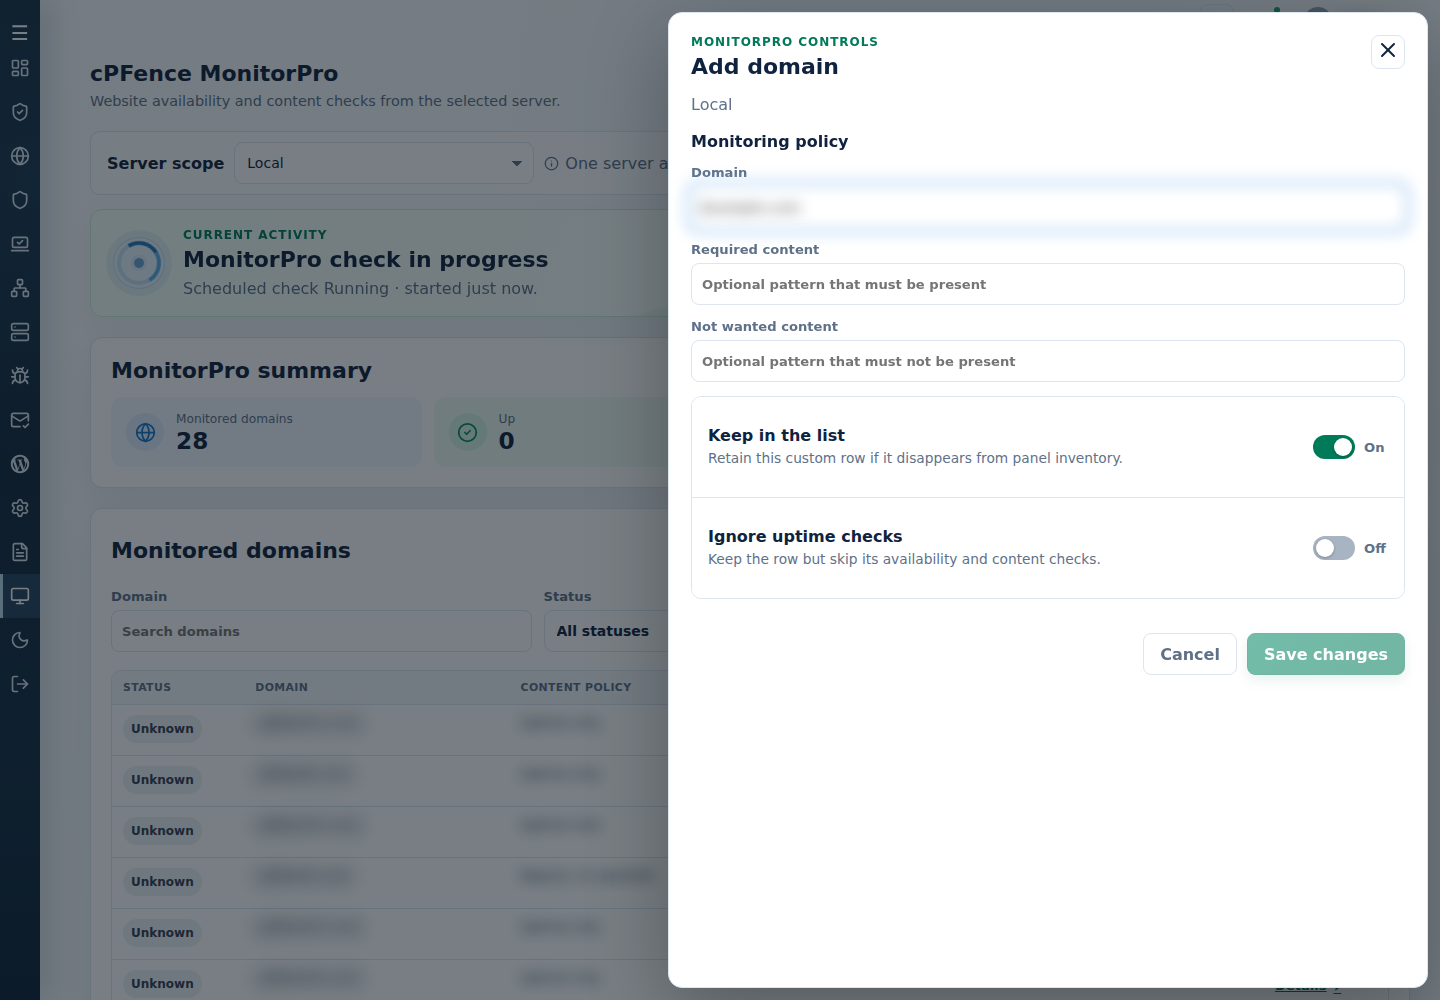
Still prefer a bulk CSV? Open Edit Configuration Files → MonitorPro site list for the intended checking server, preserve existing rows and the five-field format below, then save and inspect the result.
Back up your current list first. Edit the file in Excel or a similar tool and save it as a comma-separated CSV, keeping the header and existing rows. Upload it to the server you want to run the checks from:
/var/log/cpfenceav/monitor-sites-list.csv
The uploaded file must be owned by root and must not be writable by group or others; permissions 600 are a safe choice. Keep the exact five-column header below and save without a UTF-8 BOM.
Windows line endings are accepted in cPFence v4+. Converting to Unix line endings is optional:
dos2unix <filename>
To add external domains for monitoring, append them to the CSV file like this:
domain1.com,,,Yes,

domain2.com,,,Yes,

domain3.com,,,Yes,
For advanced settings, such as keyword monitoring, the CSV format is straightforward:
Domain,Required Content,Not Wanted Content,Keep in the list,Ignore Uptime Check
Want to keep an external domain when the cluster list refreshes? Just set “Yes” under the Keep in the list column.
MonitorPro Format Explained:
Here’s a breakdown with an example to clarify the terms:
- Domain: The website you want to monitor, e.g.,
google.com. - Required Content: Specify a keyword or phrase that must appear on the page to ensure it is functioning correctly (e.g., “Google”). This ensures the site isn’t just showing a blank page or an unexpected error.
- Not Wanted Content: Specify a keyword or phrase that should not appear on the page (e.g., “404 Error”). If this text is found, it may indicate an issue with the site.
- Keep in the List: Set to “Yes” if the domain isn’t part of your Enhance cluster but you want to monitor it. This is useful for external or competitor sites to avoid auto-removal by cPFence.
- Ignore Uptime Check: If you don’t want to monitor uptime for a specific site (e.g., a problematic client’s site with frequent issues), set this to “Yes.”
For alerts, configure the server’s notification recipients and delivery channel separately. After a failed or incomplete check, inspect the activity problem before retrying. See MonitorPro checks and outcomes for content failures, history and recovery.
Why Choose MonitorPro?
MonitorPro is more than just a monitoring tool. It’s an all-in-one solution that integrates seamlessly with the rest of the cPFence suite:
- The Owl Module: Keeps an eye on CPU, RAM, disk space, and I/O, notifying you of any server issues.
- Owl AutoMySQL Module: Monitors MySQL queries to prevent load spikes.
- WP-AutoShield: Secures and monitors all WordPress sites, with instant alerts for integrity check failures or malware detection.
Start Your Free Trial Today
Experience the power of full monitoring and security brought to you by cPFence Web Security. With MonitorPro, you get seamless, automated monitoring—without the headaches. Take your hosting business to the next level.
Start free trial