Simplify Cluster Management with cPFence Bulk Tools + MultiRun

Note of Caution: This tool is designed for experienced administrators. Misuse can lead to unintended consequences across all servers. If you’re not confident in your Linux skills, we recommend steering clear of this tool—it’s powerful but unforgiving.
cPFence recently launched a game-changing arsenal of bulk tools for Enhance Servers, designed to save administrators an immense amount of time. From clearing cache, installing LiteSpeed plugin with Advanced Presets and Redis ON, and running due cron jobs, to creating new users, resetting LiteSpeed plugins, Installing / Uninstalling Plugins , and much more, cPFence has turned tedious tasks into one-click operations.
Here’s a big cPFence v4+ upgrade: normal WebUI cluster management and the WordPress bulk actions below no longer need passwordless SSH between servers. cPFence uses its verified server connections, so you don’t need to distribute root SSH keys for those operations. MultiRun still requires passwordless SSH because it opens synchronized SSH terminals for arbitrary Linux commands.
But many Enhance users had one question in mind: What if we could run these tools across all servers in our cluster? With clusters of 30 or more servers, running commands individually isn’t practical. And let’s face it—Enhance is all about efficient cluster management through a single control panel.
While some users rely on tools like ClusterSSH, we have found that it is not as efficient, and managing clusters with Tmux manually can be tedious. This is where the cPFence MultiRun Tool comes in. Imagine managing all servers in your cluster with just one command—automatically fetched server IPs, one seamless Tmux session, and a powerful tool to run commands across your entire fleet.
Bulk Operations Made Effortless
Picture this:
- Installing LiteSpeed Plugin: Deploy and configure it with advanced presets and enable Redis caching on all WordPress sites across 30 servers in seconds.
- Uninstalling Plugins Server-Wide: Remove unwanted plugins across all servers with one command.
- Running Due Cron Jobs: Execute all pending WordPress cron jobs across your entire cluster instantly.
- Updating Security Features: Bulk-enable features like XSS protection or automatic idle user logout for WordPress sites on all servers.
- Creating New WordPress Users: Add a new admin user across all sites on every server with ease.
For the ready-made WordPress tools, open WordPress Management, choose Server scope or Select servers, filter the sites and check the intended rows. Select all visible selects the current page; Select all … filtered sites includes matching sites on other pages. Then use Choose action → Bulk tools. The Performance group brings LiteSpeed and Cron operations together.
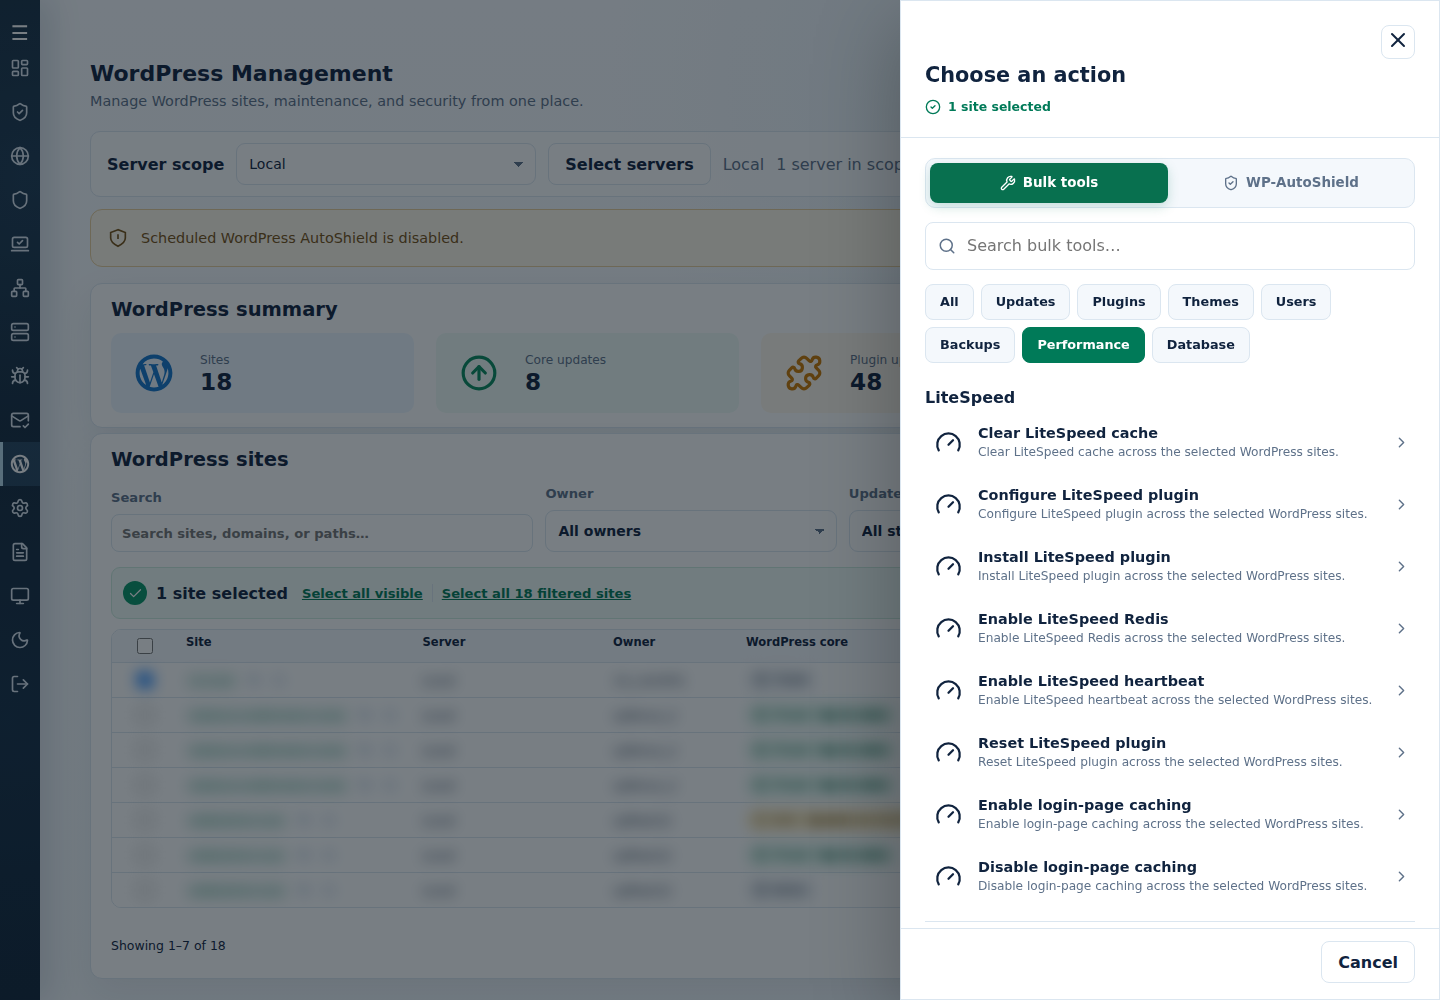
Choose the action and review any options. Before running it, check Selected sites, Action and options and Target servers in Confirm WordPress action. The final button names the action and site count. Read each site’s final result before moving on; a submitted action is not the same as a completed change.
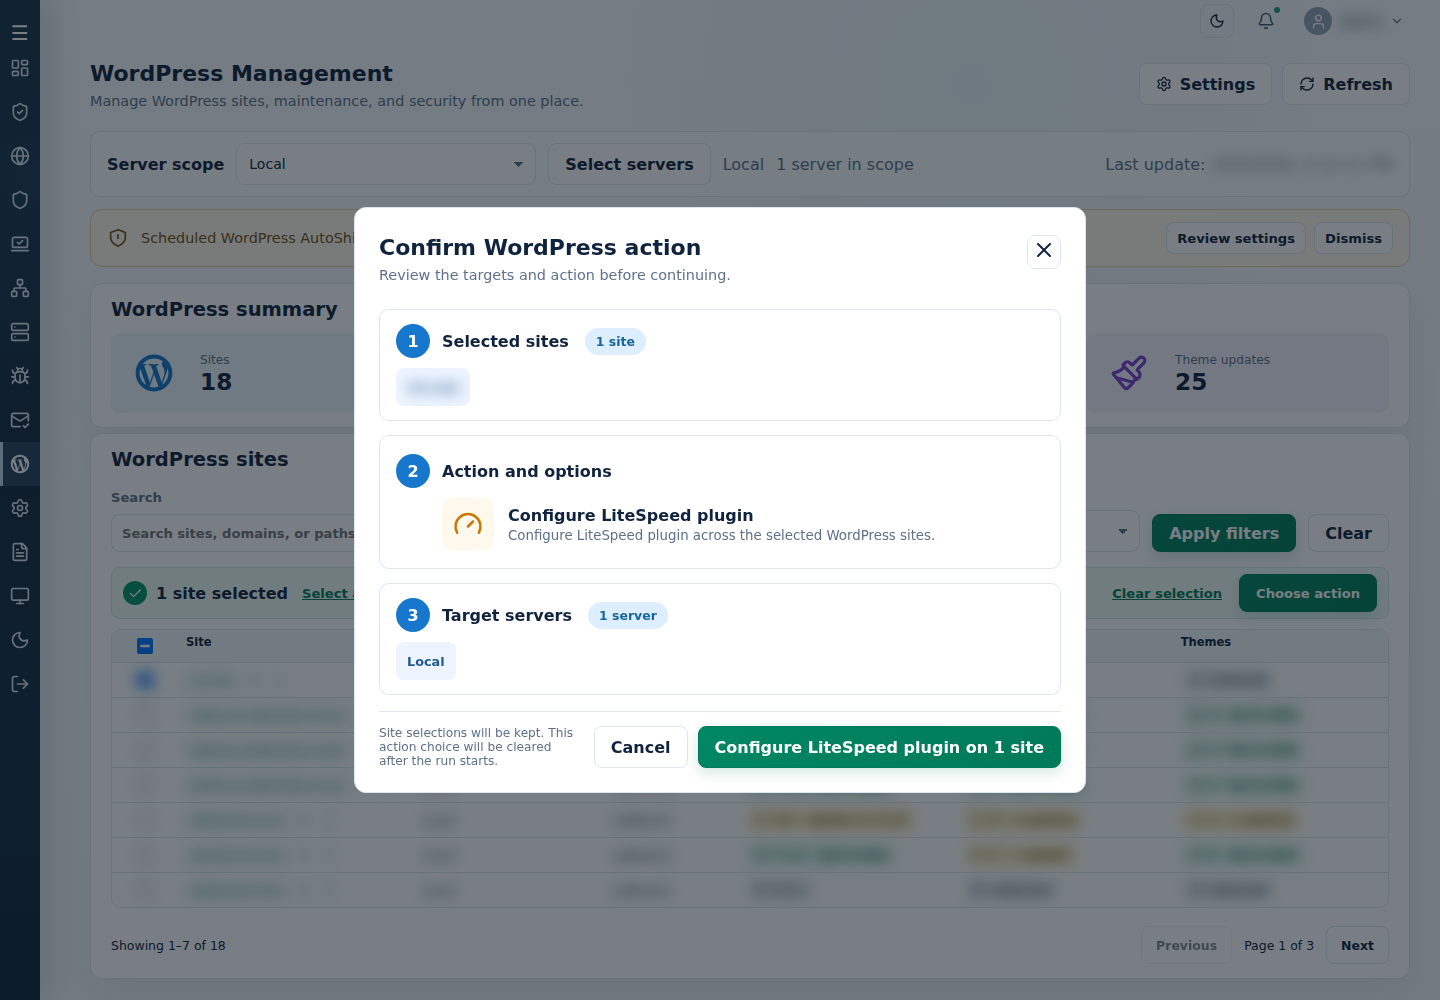
These WebUI operations do not need MultiRun or passwordless SSH. For cache or plugin changes, back up the affected sites and start with a small selection. WordPress bulk management covers selections, results and recovery.
Prefer the CLI for a local task? As root on the intended application server, cpfence --bulk-configure-ls-plugin configures LiteSpeed, cpfence --bulk-clear-litespeed-cache clears its cache, and cpfence --bulk-run-due-wp-cron runs due WordPress cron events. Review that server’s WordPress site list first; WebUI checked rows are not a CLI selection.
With the cPFence MultiRun Tool, your imagination is the only limit. Combined with cPFence’s robust features, it’s a must-have for any administrator managing Enhance clusters.
Getting Started in Minutes
Setting up the cPFence MultiRun Tool is quick and straightforward. For MultiRun itself, enable passwordless SSH login from the main control panel server to each intended target. You also need an interactive terminal and tmux installed. This SSH setup is not required for the WebUI bulk tools above.
Here’s how:
- Generate an SSH Key Pair:
Runssh-keygen -t ed25519on your main control panel server to create an Ed25519 key pair. Preserve existing administrator keys. - Copy the Key to Target Servers:
- If password login is enabled: Use
ssh-copy-id root@<server-ip>to copy the public key. - If password login is disabled: Manually copy the public key (e.g.,
~/.ssh/id_ed25519.pub) to~/.ssh/authorized_keyson the target server.
- If password login is enabled: Use
- Test the Connection:
Verify passwordless login by runningssh root@<server-ip>. Repeat for all servers.
Verify each target’s host-key fingerprint through a trusted route before accepting it. Keep a working administrator session and recovery route while setting up access; secure SSH access covers the precautions.
Once you can log in to all servers without entering a password, you’re ready to roll.
Activating the MultiRun Tool
To start the tool, simply run:
cpfence --multirun
In cPFence v4+, the tool prepares and attaches to its synchronized Tmux session automatically. Want to keep the setup prompts? Use cpfence --multirun manual. On the main control panel server it can discover cluster IPs; review /etc/cpfcli/remote/multirun.txt before running, because an existing target list is reused in automatic mode.
To reattach after detaching, use the dedicated v4 socket and session:
tmux -L cpfcli-multirun attach -t multi-server
You’ll have all your servers open in a synchronized Tmux session, ready for bulk commands.
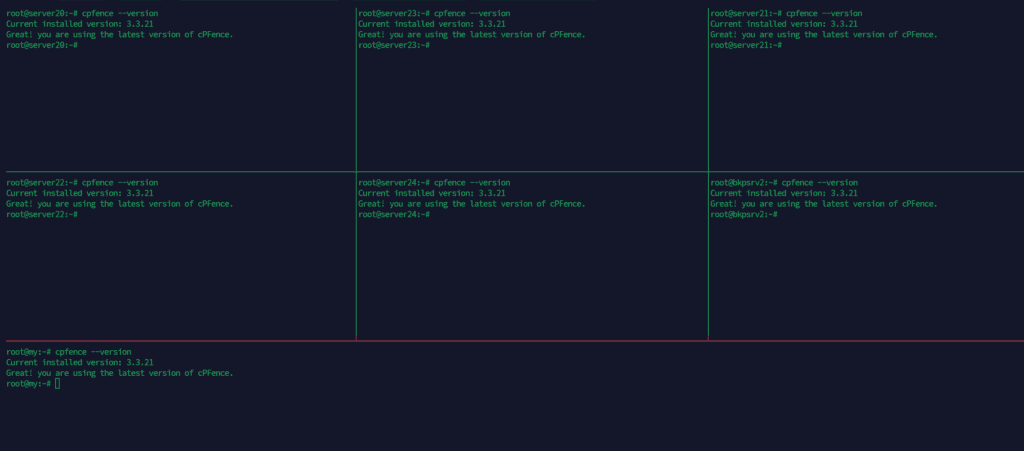
Original MultiRun terminal illustration; use the cPFence v4+ commands above.
Press Ctrl+B, then D to detach and leave the session running. Wait for every server to finish before sending another command; synchronized input reaches every pane.
Collaborative and Real-Time Monitoring
The MultiRun Tool isn’t just about efficiency; it’s also about teamwork.
- Share Sessions: Allow multiple team members to attach to the same session with
tmux -L cpfcli-multirun attach -t multi-serverand collaborate in real-time. Watch as commands are typed and executed across all servers. - Monitor Operations: Use a shared screen in your office to monitor sensitive bulk operations being performed by your administrators across all servers.
Flexibility and Power
The MultiRun Tool supports any Linux commands, making it a versatile addition to your toolkit. Whether it’s managing Enhance clusters, configuring WordPress sites, or running system-level commands, the possibilities are endless.
Note of Caution: This tool is designed for experienced administrators. Misuse can lead to unintended consequences across all servers. If you’re not confident in your Linux skills, we recommend steering clear of this tool—it’s powerful but unforgiving.
The Future of Cluster Management
With the cPFence MultiRun Tool + New Bulk Tools , managing Enhance clusters has never been easier or more efficient. From routine maintenance to complex operations, this tool ensures you can get the job done faster and smarter.
We hope this update becomes a valuable part of your daily server management routine. Happy bulk commanding!
Bring your cluster tools together
Try cPFence v4+ for WebUI bulk operations without passwordless SSH, with MultiRun available when you deliberately need synchronized terminals.
Start free trial