
Manage WordPress sites in bulk
Use WordPress Management to apply one operation to an explicit set of WordPress sites. This guide covers the Enhance WebUI. For security policies, see WordPress security and integrity; for recovery, see WordPress backups.
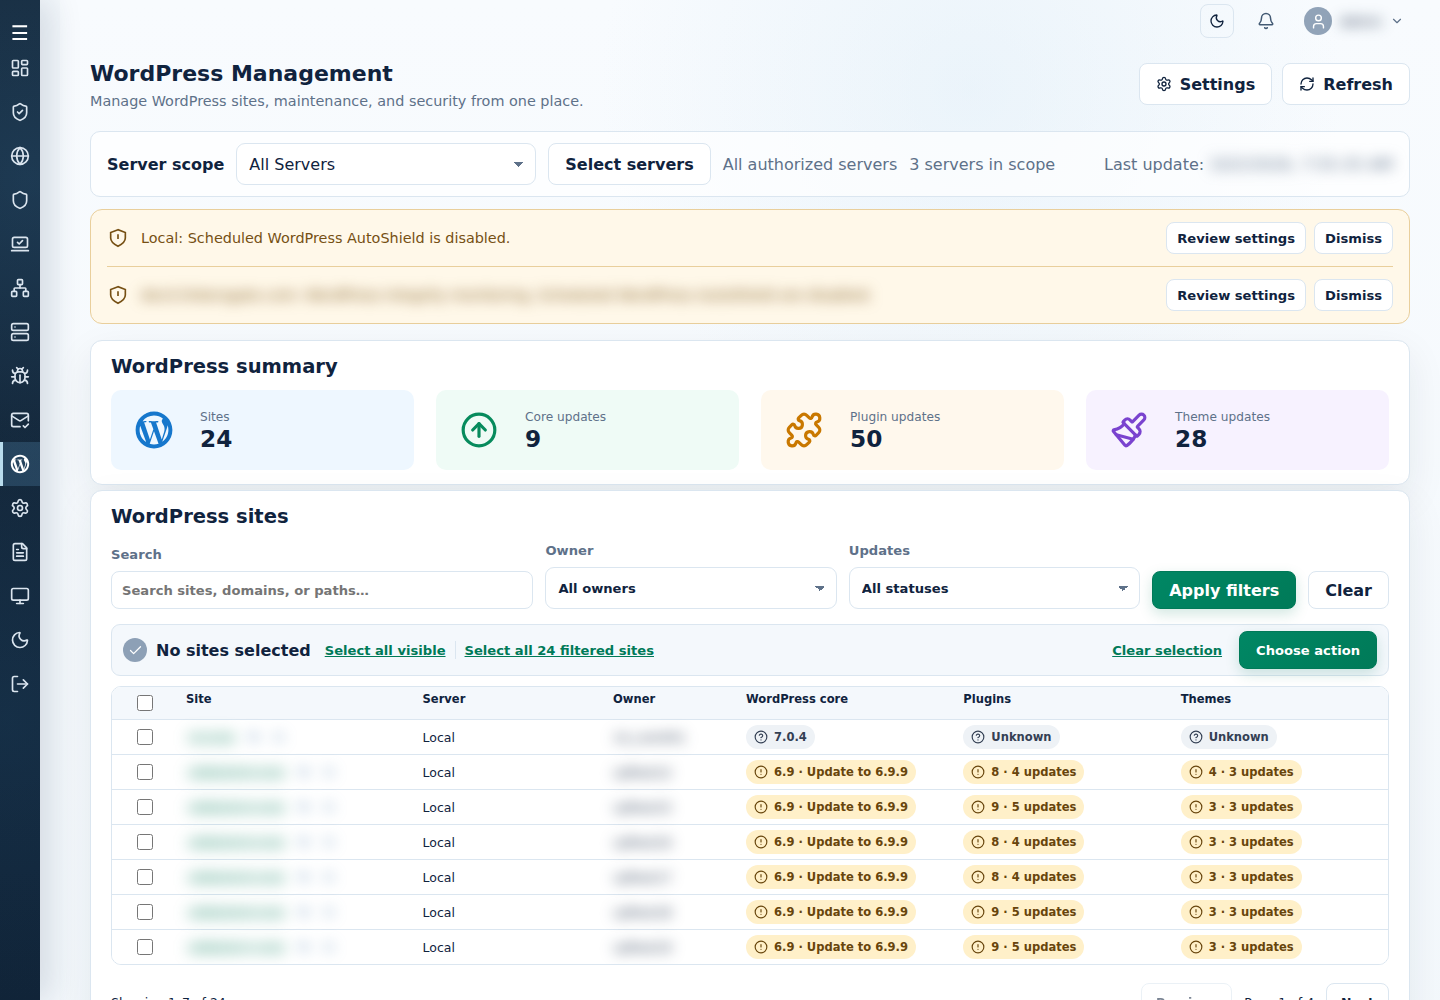
Support users need site/server access and the permission for the chosen action. Back up sites before updates, deletion or resets. Start with one site.
1. Select the exact sites
Section titled “1. Select the exact sites”- Open WordPress Management and choose Server scope. Check notices for unavailable secondary servers.
- Use Search, Owner and Updates, then Apply filters to find sites. Filters narrow the table; they do not select sites.
- Select individual rows, Select all visible, or Select all … filtered sites. The filtered option includes matching sites beyond the current page. Use Clear selection to start again.
- Click Choose action. Use Bulk tools or WP-AutoShield, then choose a category or search for the operation.
- If options appear, fill them and click Review action; otherwise the target confirmation opens directly. Check the action, site count and servers, then confirm. Cancel submits nothing.
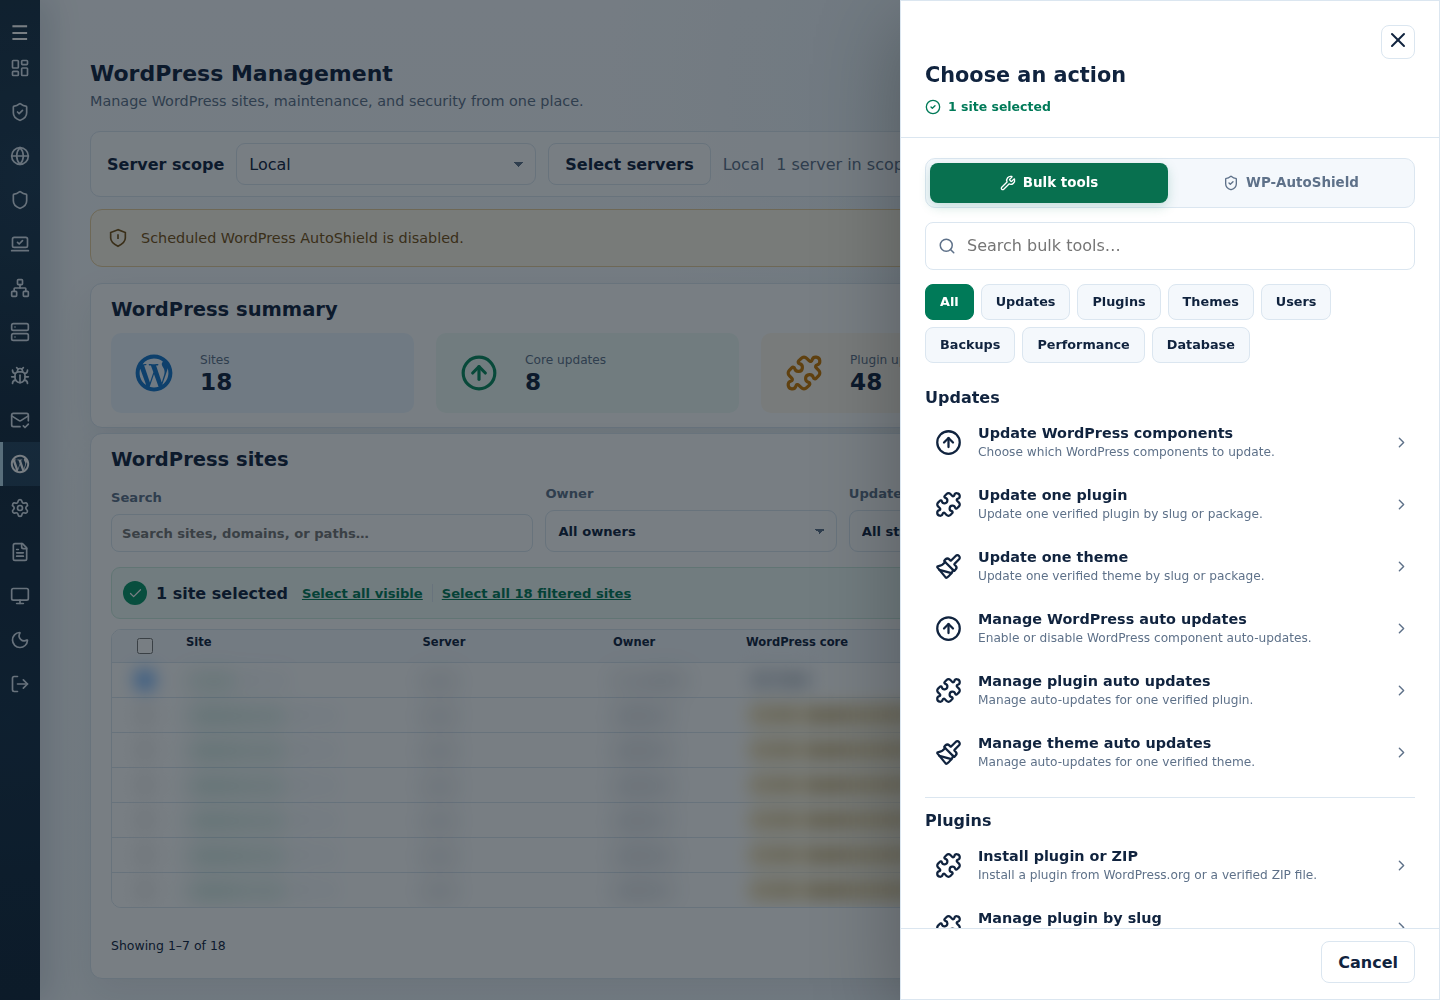
Refresh checks stored update information across the server scope; it does not install updates. Generate WordPress sites list and remote-backup enable/disable also use the server scope, rather than checked rows.
2. Choose the operation
Section titled “2. Choose the operation”Updates and update policy
Section titled “Updates and update policy”Follow component updates, one plugin, one theme or future auto-update policy.
| Action | Options and expected effect |
|---|---|
| Update WordPress components | Choose All components, WordPress core, Plugins, Themes or Translations. Installs available updates for that component on selected sites. |
| Update one plugin / Update one theme | Choose a repository slug or package source. For a repository slug, click Verify slug before reviewing the action; editing the slug requires verification again. |
| Manage WordPress auto updates | Choose Enable/Disable and the component. This changes future update policy; it does not run an update immediately. |
| Manage plugin auto updates / Manage theme auto updates | Choose Enable/Disable and verify the single component’s slug. Check each site’s actual result, including a component that is absent. |
Automatic translation updates have a compatibility limitation: WordPress may still apply them after the translation auto-update option is disabled. Treat that switch as a stored policy choice, not a guarantee that all translation updates stop.
Plugins, themes and uploaded packages
Section titled “Plugins, themes and uploaded packages”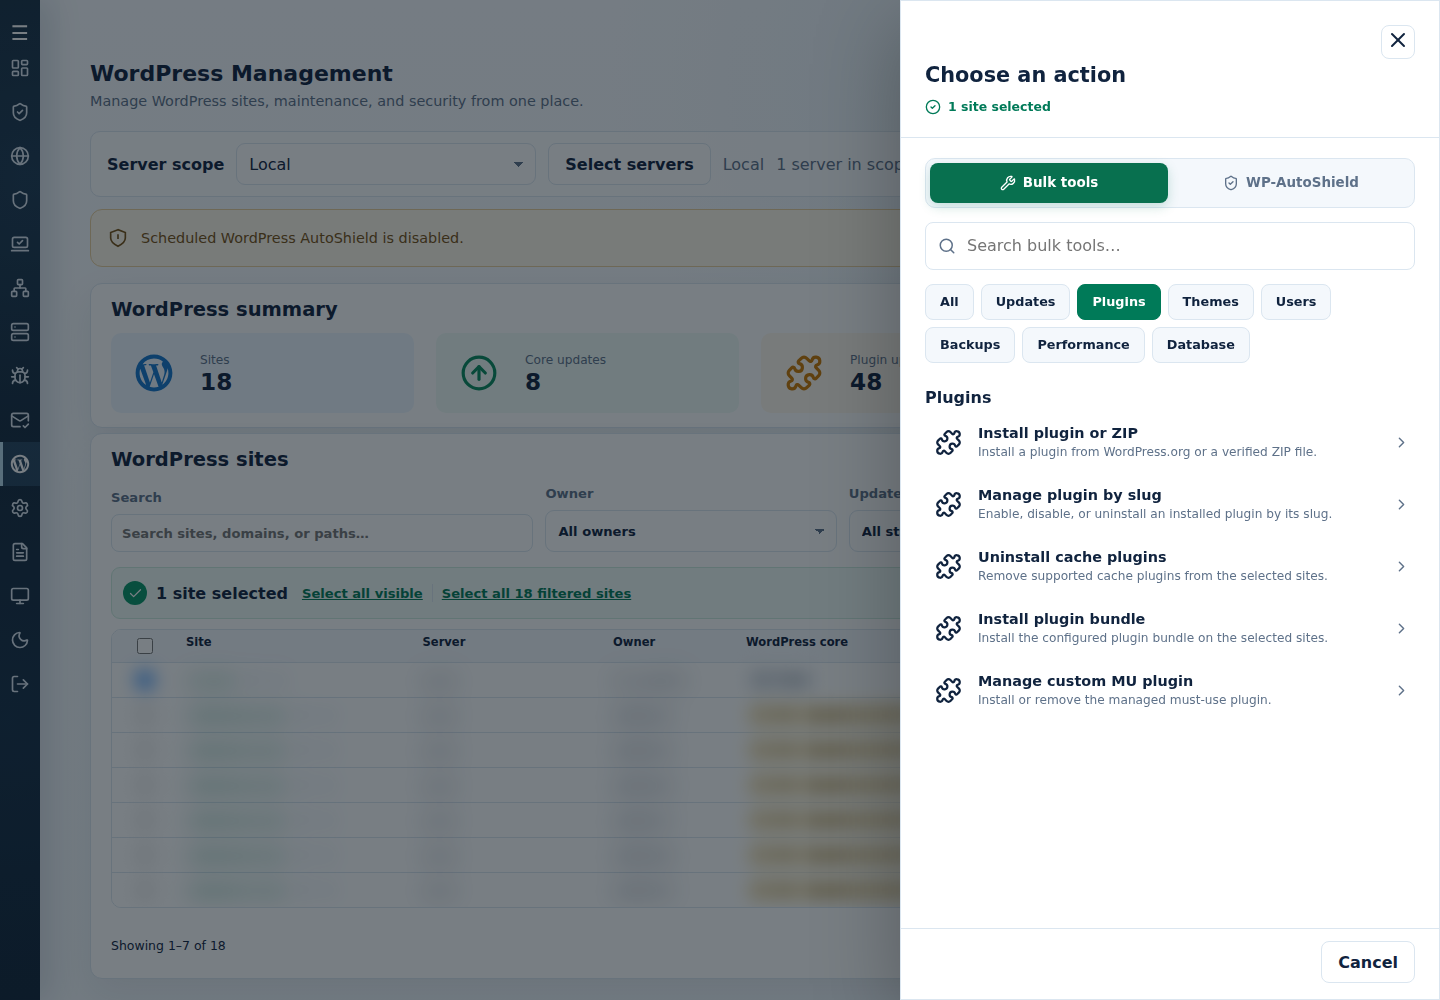
Focused steps cover plugin installation, enable/disable, uninstall, bundles, custom MU plugins, theme installation, activation and deletion.
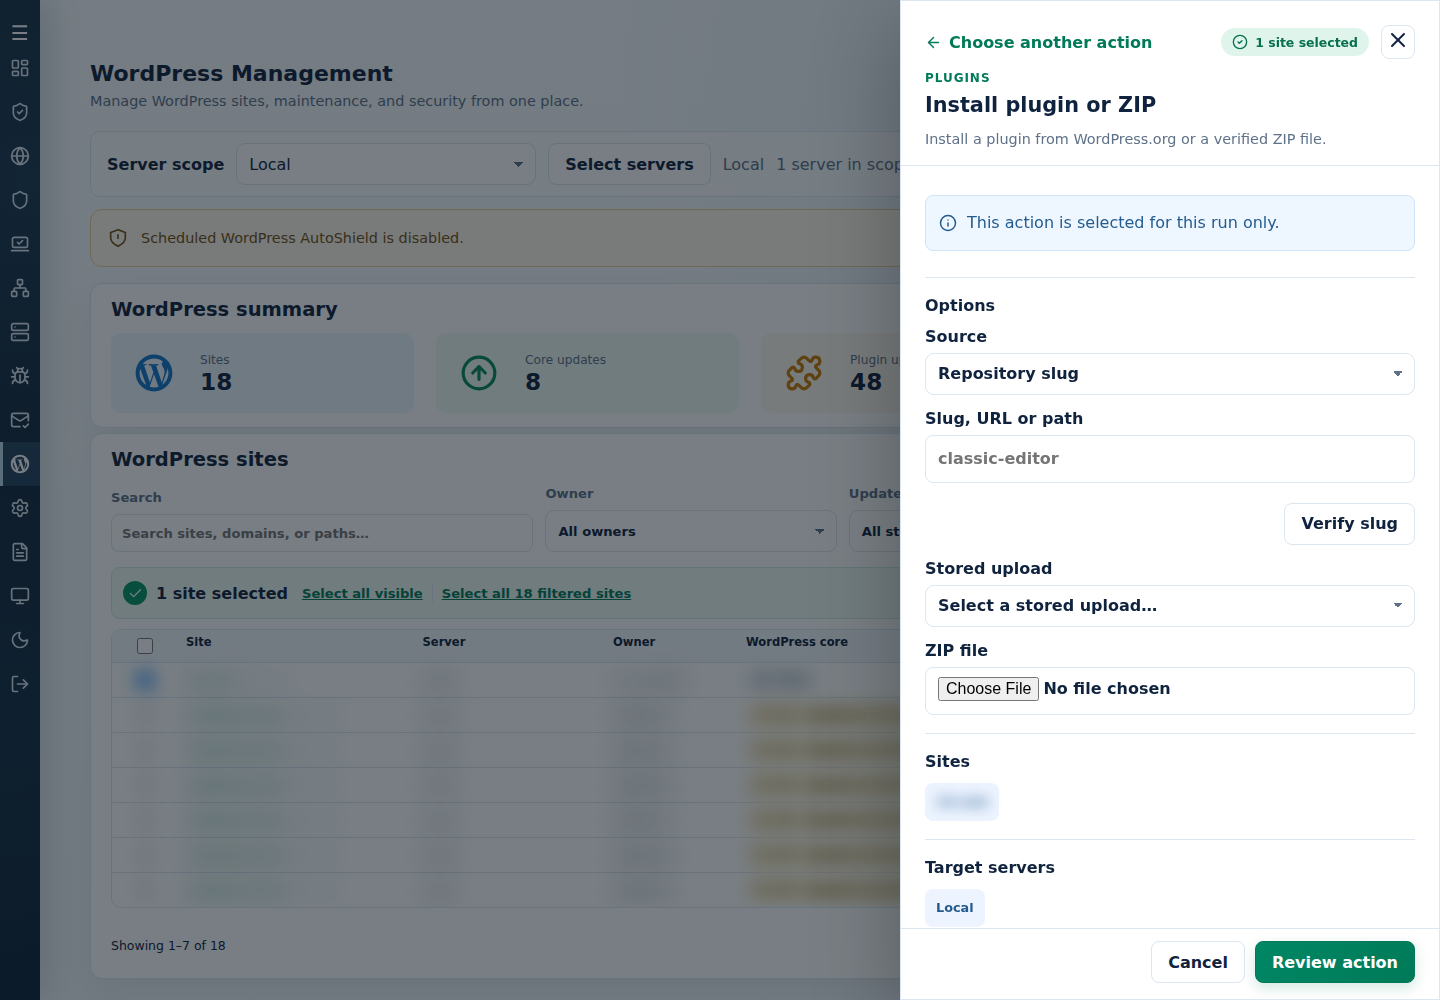
Install plugin or ZIP, Install theme or ZIP and single-component update forms offer Repository slug, HTTPS URL, Server path, Stored upload, and Upload ZIP. Choose a trusted source and fill its field. Verify repository slugs; a server path must exist on the execution server. An upload still needs a successful installation result.
In Install plugin or ZIP, use Slug, URL or path for the first three sources, Stored upload for a saved package, or ZIP file for a new upload.
| Action | Options and consequences |
|---|---|
| Manage plugin by slug | Enter Installed plugin slug and choose Enable, Disable or Uninstall in Operation. Disabling preserves the plugin; uninstalling removes it and may invoke its cleanup. |
| Uninstall cache plugins | Removes the supported cache/Redis plugins from selected sites, with LiteSpeed Cache excluded from this removal. Keep reinstall packages/settings if recovery may be needed. |
| Install plugin bundle | Installs the configured required bundle. Administrators can inspect Required plugin bundle in Edit Configuration Files before applying it. |
| Manage custom MU plugin | Choose Install/Uninstall and a stored PHP file or New MU plugin file. MU plugins load automatically. Delete stored file removes the stored upload from the current server scope; it does not substitute for uninstalling a deployed plugin. |
| Activate theme by slug | Enter Installed theme slug. Activation changes the site’s presentation. |
| Delete theme by slug | Enter Installed theme slug to delete an installed inactive theme. Switch away from an active theme first and preserve a copy for recovery. |
After completion, check the site’s plugin/theme version, activation and public pages. Disabling a daily installation/removal setting does not reverse extensions already installed or removed.
WordPress users
Section titled “WordPress users”Follow create, list, password reset or delete/reassign for focused steps.
| Action | What to supply and check |
|---|---|
| Create WordPress user | Enter username, email, password and role. The create form does not accept commas in the password. Check that this account is intended on every selected site. |
| List WordPress users | Choose All roles or one role; review the per-site export/output. |
| Reset all passwords | Choose a role carefully: All roles is broad. It generates new passwords for matching users. |
| Reset one user password | Supply login, email or numeric ID. Enter a New password when you need a known replacement; leaving it blank generates one. |
| Delete user and reassign content | Supply login, email or numeric ID. Content is reassigned to an available administrator; a site without a suitable administrator can be skipped. |
| Delete user without reassignment | Deletes the account and its associated content using WordPress deletion behavior. Preserve a backup; do not depend on the trash to recover everything. |
Reset commands skip WordPress’s reset email; the WebUI hides passwords from output. Use a known replacement for an individual account or arrange WordPress password recovery. Generated passwords are not revealed in the job log.
Maintenance, database and LiteSpeed
Section titled “Maintenance, database and LiteSpeed”For overdue posts or plugin events, follow Run overdue WordPress cron events.
| Action group | How to use it |
|---|---|
| Enable WordPress Cron, Disable WordPress Cron, Run due WordPress Cron | Enable/disable request-triggered cron or execute due events now. Disabling request-triggered cron does not create an external scheduler; arrange one for scheduled posts and plugin tasks. |
| Enable search-engine indexing / Disable search-engine indexing | Change WordPress’s visibility preference. This preference is not access control. |
| Enable maintenance mode / Disable maintenance mode | Show/remove WordPress maintenance mode. Confirm the public site recovers after disabling it. |
| Optimize databases | Optimizes selected WordPress databases. Expect database work; schedule it when the host has spare capacity and preserve a backup. |
| Switch WordPress language | Enter a valid locale such as en_US. Check installed resources and the resulting language. |
| Clear LiteSpeed cache | Purges the selected sites’ supported cache; subsequent requests may rebuild it. |
| Install LiteSpeed plugin / Configure LiteSpeed plugin | Install the plugin or apply its supported configuration. Check site behavior and retain any custom settings first. |
| Enable LiteSpeed Redis / Enable LiteSpeed heartbeat | Apply the corresponding plugin configuration. Redis needs a working eligible connection. |
| Enable login-page caching / Disable login-page caching | Change LiteSpeed’s login-page cache policy. Uncached login pages are needed for WAF CAPTCHA behavior. |
| Reset LiteSpeed plugin | Resets its configuration; it is broader than a cache purge. Record custom configuration before confirming. |
Security and integrity
Section titled “Security and integrity”Choose WP-AutoShield in the action picker for these actions. Use the security guide to configure daily policy, integrity monitoring and exclusions.
| Action | Intended outcome |
|---|---|
| Run WP-AutoShield | Apply the target server’s configured policy to selected eligible sites; policy exclusions still matter. |
| Rename default admin | Rename the default account. Check the per-site output and resulting login. |
| Enable XML-RPC / Disable XML-RPC | Permit/restrict XML-RPC independently of pingbacks. |
| Enable login limits / Disable login limits | Turn WordPress repeated-login protection on/off. |
| Enable login CAPTCHA / Disable login CAPTCHA | Change the WordPress authentication CAPTCHA. |
| Enable idle logout / Disable idle logout | Change idle-session protection. |
| Enable security headers / Disable security headers | Change headers on WordPress responses. |
| Set secure keys | Initialize missing keys; a site with existing nonempty keys retains them. |
| Set secure permissions | Apply secure WordPress file permissions; record custom requirements first. |
| Enable dashboard file editing / Disable dashboard file editing | Permit/restrict the built-in plugin/theme editor. |
| Enable pingbacks / Disable pingbacks | Change default pingback options. |
| Enable WordPress hardening / Disable WordPress hardening | Apply/remove supported hardening rules. |
| Enable scripts in posts / Restrict scripts in posts | Permit/restrict unfiltered HTML for editing; this does not remove existing scripts. |
| Uninstall blacklisted plugins | Remove plugins in the configured blacklist. Keep a backup for recovery. |
| Scan databases for malware | Scan selected WordPress databases. Inspect findings; a database finding is separate from a filesystem finding. |
| Export vulnerability report | Produce the selected sites’ report. Review the recorded output location; a report does not install fixes. |
Restore WordPress core files, under Bulk tools, replaces modified core with clean copies. It does not restore the database. Review backups and exclusions first; check public pages afterward.
Backups
Section titled “Backups”| Action | Scope and purpose |
|---|---|
| Back up selected sites / Restore selected sites | Use checked site rows to create or restore a verified site-file archive and database export pair. Restore replaces current site data. |
| Enable remote backups / Disable remote backups | Change future storage for the reviewed server scope. |
Follow the backup and restore steps for schedules, exclusions, remote destinations, snapshot selection and recovery.
3. Read the outcome
Section titled “3. Read the outcome”The output shows Running, then Finished or Needs attention.
- Finished: the run completed. It can include sites that failed or were skipped; each failed site is listed in the output and in that command’s error log on its server, such as
/var/log/wordpress-disable-cron-error.log. - Needs attention: the run itself failed, a ZIP plugin or theme update failed, or no final status arrived.
Read every site’s result before treating the action as complete.
After a lost connection, check the site and recorded outcome before retrying. If scope or permissions changed, refresh and review again. Confirmed targets do not grow when a secondary server joins.
Check website health after updates. Reverse policy changes with their paired action; recover deleted data from a suitable backup.
Other focused tasks: LiteSpeed setup, presets, purge, reset, Redis, heartbeat, login cache, maintenance, indexing, database optimization, language, site inventory and scheduling a command.
Command-line method
Section titled “Command-line method”Use a root terminal on the server hosting the sites. Start by generating its WordPress list:
cpfence --generate-wp-sites-listReview /var/log/cpfenceav/wp-sites-list.txt and retain only the intended installations for ordinary manual bulk tools. Regenerating the list can restore discovered entries, so check it again before each run. Read site inventory for the current format.
Choose one task, read its prompts and check each site’s final output. The original feature groups remain available with their current arguments in the WordPress command reference:
| Feature group | Follow the task guide |
|---|---|
| Daily AutoShield, integrity and exceptions | Security policy and integrity; exclusions |
| Updates, automatic updates and vulnerability reports | Updates; future policy; vulnerability reports |
| XML-RPC, login limits, CAPTCHA, idle logout and admin rename | Access controls |
| Permissions, keys and hardening | Permissions and hardening; keys and editor controls |
| Editors, pingbacks, response headers and risky content | Editorial controls |
| Cron and overdue scheduled posts | Cron controls |
| LiteSpeed installation, presets, Redis, heartbeat, login caching, purge and reset | Use the focused LiteSpeed tasks linked above. |
| Plugin/theme installation, activation, removal, bundles and custom MU plugins | Use the focused extension tasks above; source packages and installed slugs have different requirements. |
| User creation, lists, password resets and deletion | Use the focused user tasks above; interactive commands prompt for fields, while automatic variants need arguments. |
| Maintenance, indexing and language | Maintenance; indexing; language |
| Database scans, optimization and core-file recovery | Database scans; optimization; core restore |
Commands ending in -auto generally skip confirmation; explicit update-policy components also apply without prompts. Prepare the exact scope and backups first. Keep generated passwords and user exports private.
For example, to block XML-RPC on the reviewed local sites:
cpfence --bulk-disable-wp-xmlrpcReview site integrations first and use the paired enable action only where required. Existing configured daily protections can reapply a reversed setting; use the security guide to match recurring policy. These native v4+ actions do not require passwordless SSH between cluster servers.