
Configure WordPress security and integrity
Use WordPress Management for WordPress AutoShield policy and selected-site security actions. Integrity monitoring checks WordPress core against official checksums. These Enhance WebUI workflows have separate settings and exclusions.
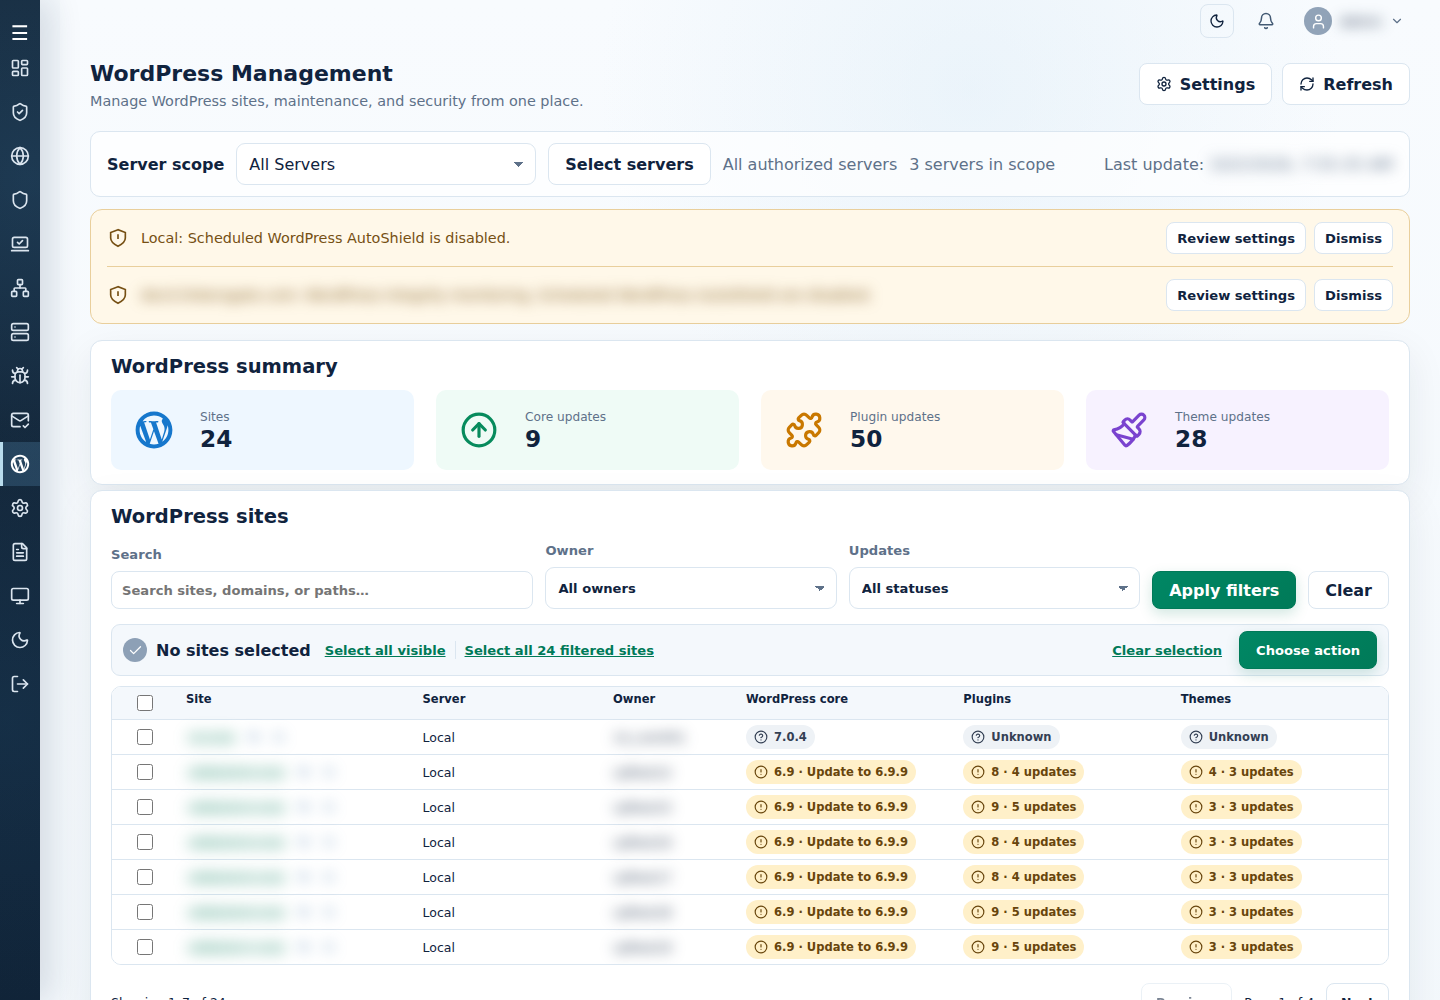
Support users need site/server access and permission for the chosen security, settings or exclusion action. Back up sites before removing plugins or repairing files. Check any XML-RPC, cron or custom login requirements.
1. Configure daily AutoShield policy
Section titled “1. Configure daily AutoShield policy”- In WordPress Management, choose Local or one secondary server in Server scope. Settings requires one specific server.
- Open Settings and review WordPress protection. Enable WordPress AutoShield for daily enforcement.
- Choose the child policies below. Check descriptions carefully: some switches turn a feature off when enabled.
- Click Save settings and check the result.
| Policy | Effect and recovery |
|---|---|
| Update WordPress site list | Discover new sites before scheduled protection. If off, maintain a valid site list; selected-site operations retain their explicit selection. |
| Automatic WordPress updates | Enables site auto-update policy during AutoShield. Turning this off stops enabling it; use Manage WordPress auto updates to disable existing site policy. |
| Vulnerability report | Generate the scheduled report. Delivery also needs its notification choice and a configured channel. |
| Disable WordPress cron | Disable request-triggered cron. Configure an external scheduler separately. |
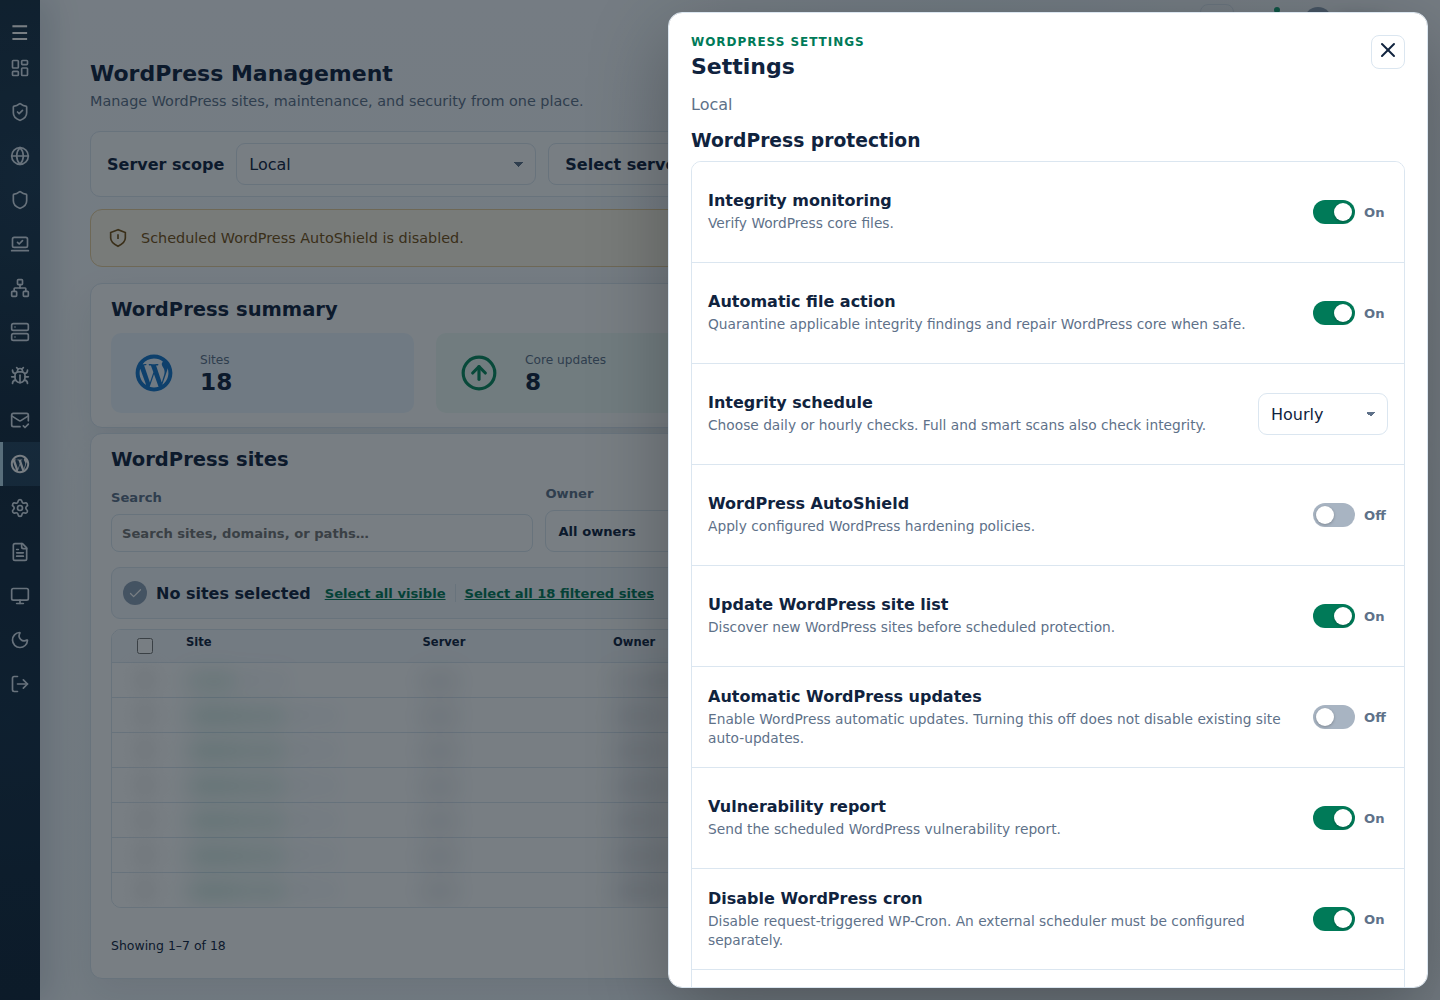
| Policy | Effect and recovery |
|---|---|
| Initialize secure keys | Fill missing WordPress authentication keys; retain existing keys. |
| Disable dashboard file editing, Disable pingbacks, Disable XML-RPC | Apply their separate restrictions. Re-enable only the capability a site needs. |
| Enforce secure permissions | Apply cPFence’s WordPress permissions. Turning this off does not restore old permissions. |
| WordPress hardening | Apply supported file/directory hardening; off removes the supported rules on the next run. nginx does not enforce .htaccess rules, so do not assume this provides PHP-upload blocking there. |
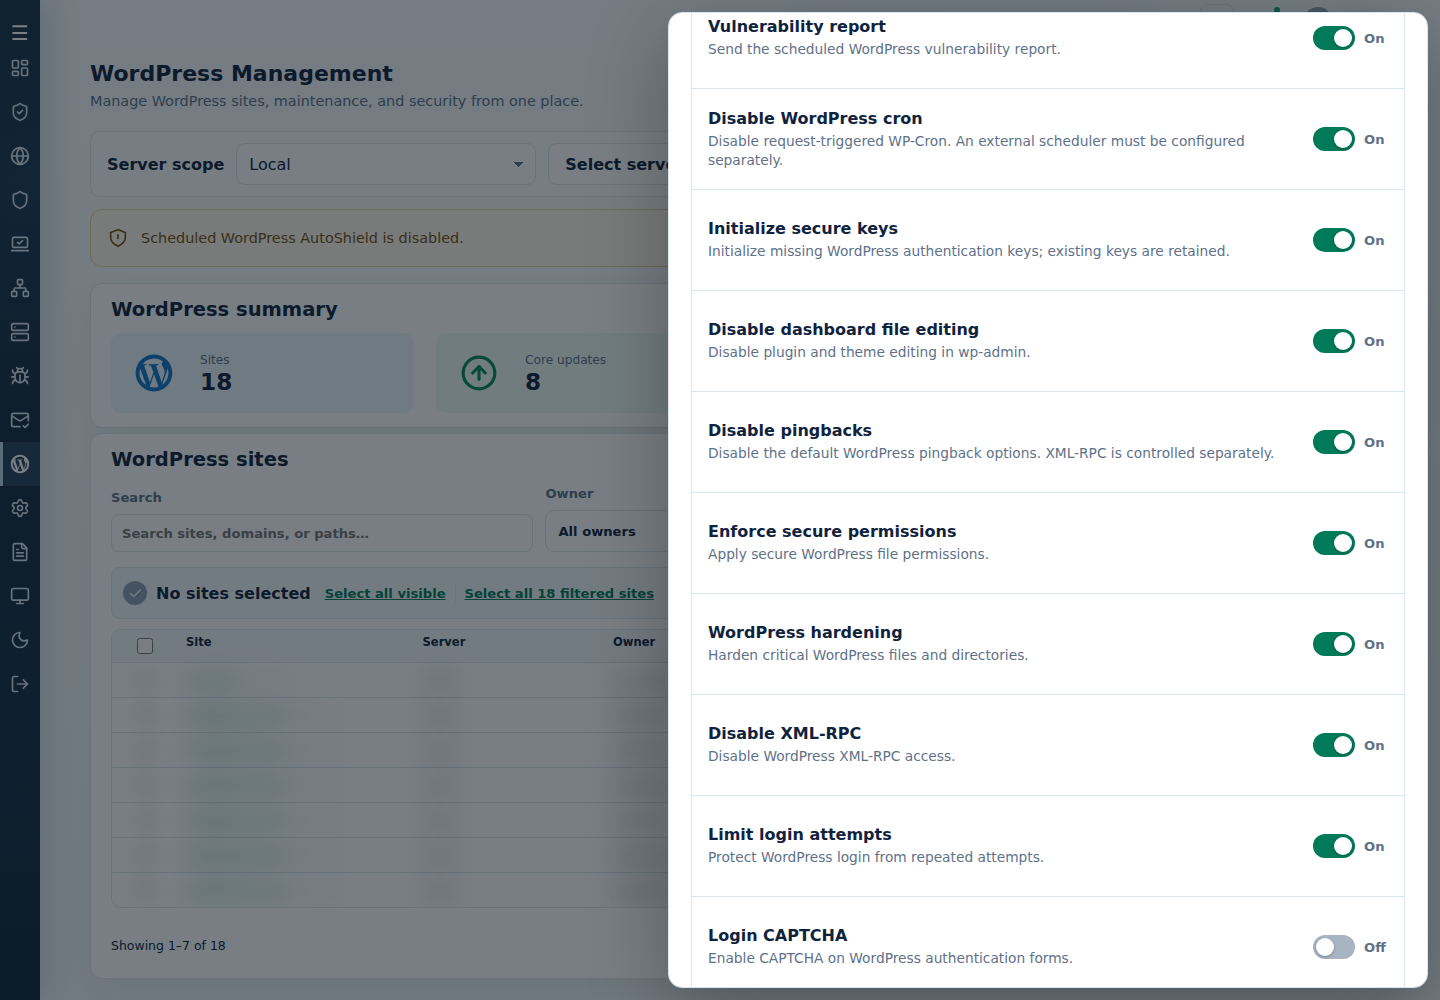
| Limit login attempts, Login CAPTCHA, Idle logout | Manage WordPress authentication protection. Idle logout defaults to 120 minutes; existing custom timeouts are retained. WordPress CAPTCHA is separate from WAF CAPTCHA. |
| Policy | Effect and recovery |
|---|---|
| Rename admin user | Rename the default admin account. Record the resulting identity and verify sign-in; off does not rename it back. |
| Restrict risky post content | Restrict unfiltered HTML on future edits. Existing posts are not cleaned. |
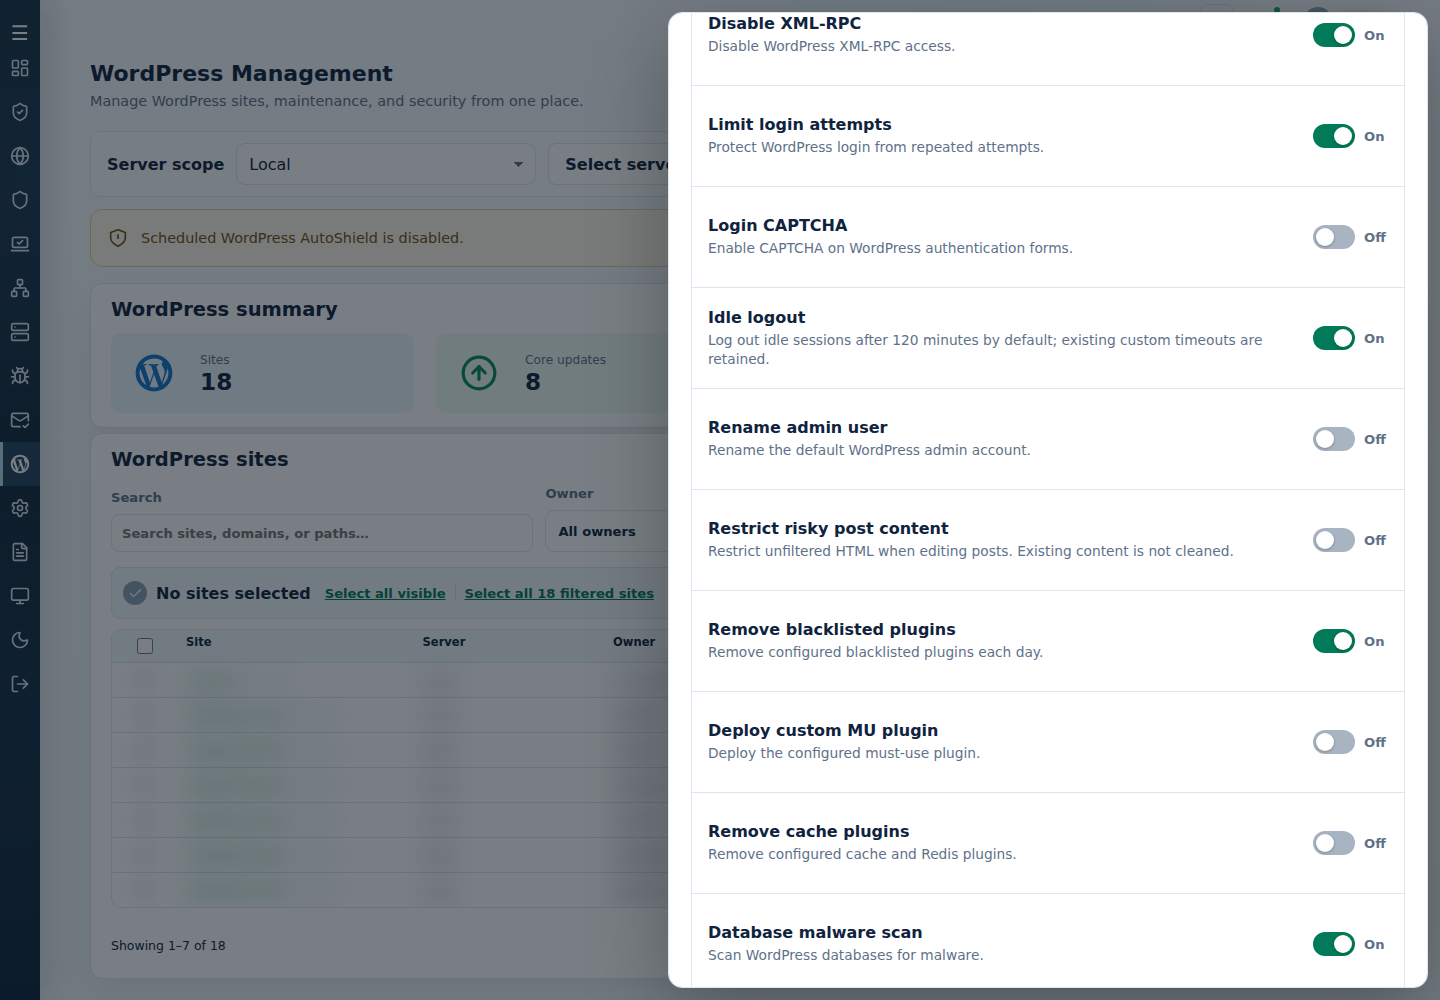
| Remove blacklisted plugins, Remove cache plugins | Remove the configured blacklist or supported cache/Redis plugins. Off does not reinstall them. |
| Policy | Effect and recovery |
|---|---|
| Deploy custom MU plugin, Required plugin bundle | Deploy the configured custom MU plugin or install the required bundle. Off does not remove existing installations. |
| Database malware scan, Database optimization | Run these daily tasks. Optimization adds database work; use available capacity. |
| Security headers | Add headers to WordPress responses; this does not configure every static or non-WordPress response. |
| Clear LiteSpeed cache, Exclude login page from LiteSpeed cache | Purge supported caches or keep login pages uncached for WAF CAPTCHA. Use the explicit login-cache action to re-enable caching later. |
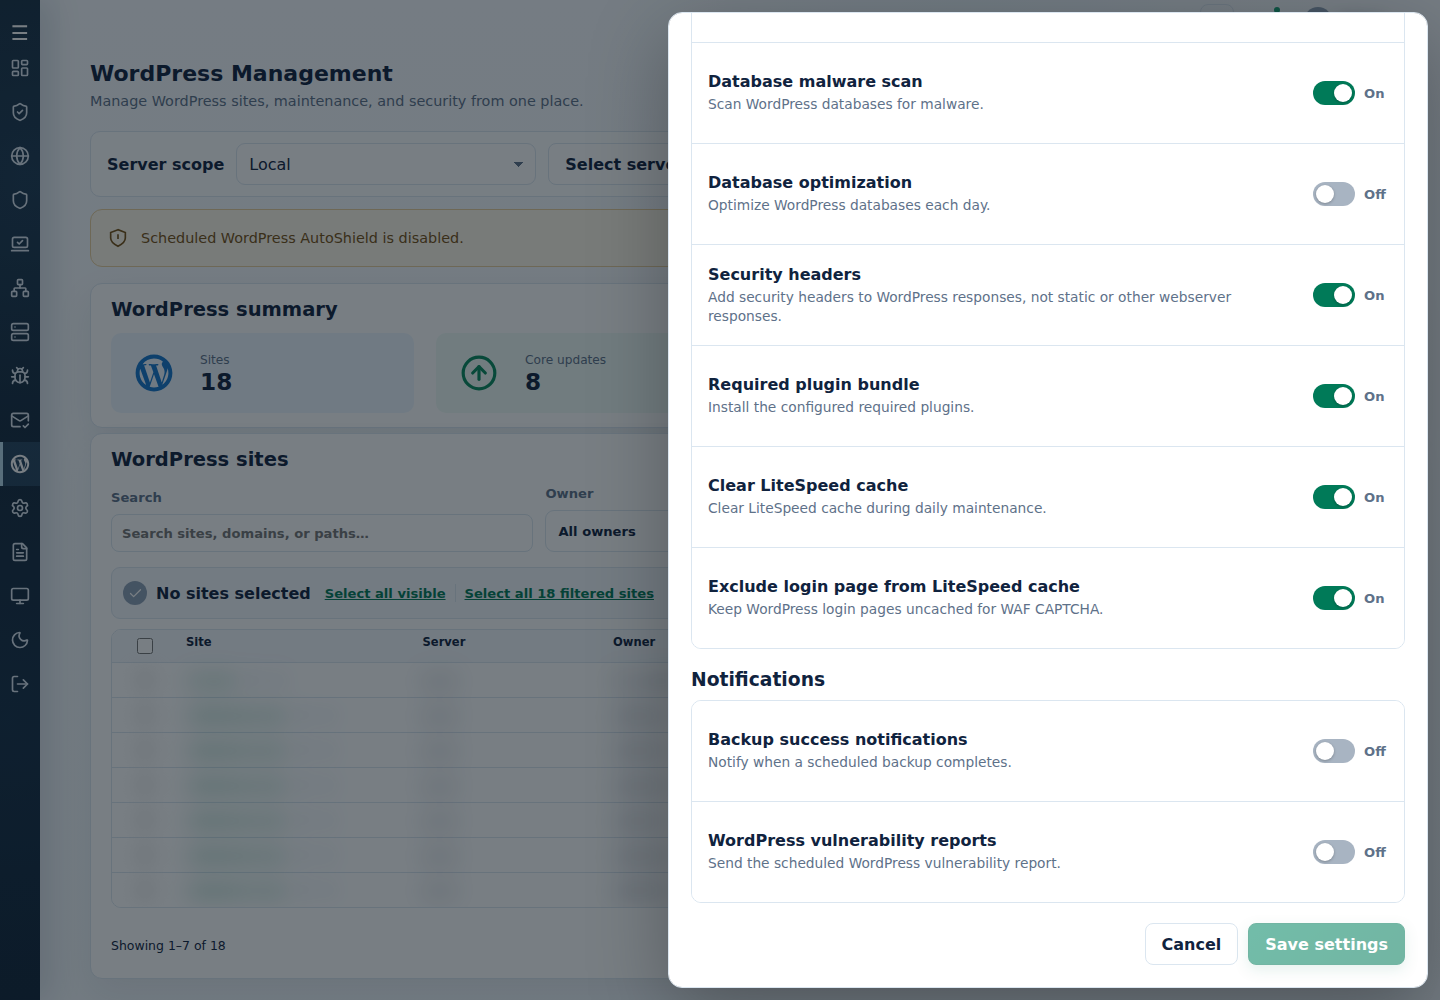
Fresh defaults have AutoShield on, automatic updates off and login CAPTCHA off. Read the target’s saved policy; existing settings can differ.
2. Apply a security action to selected sites
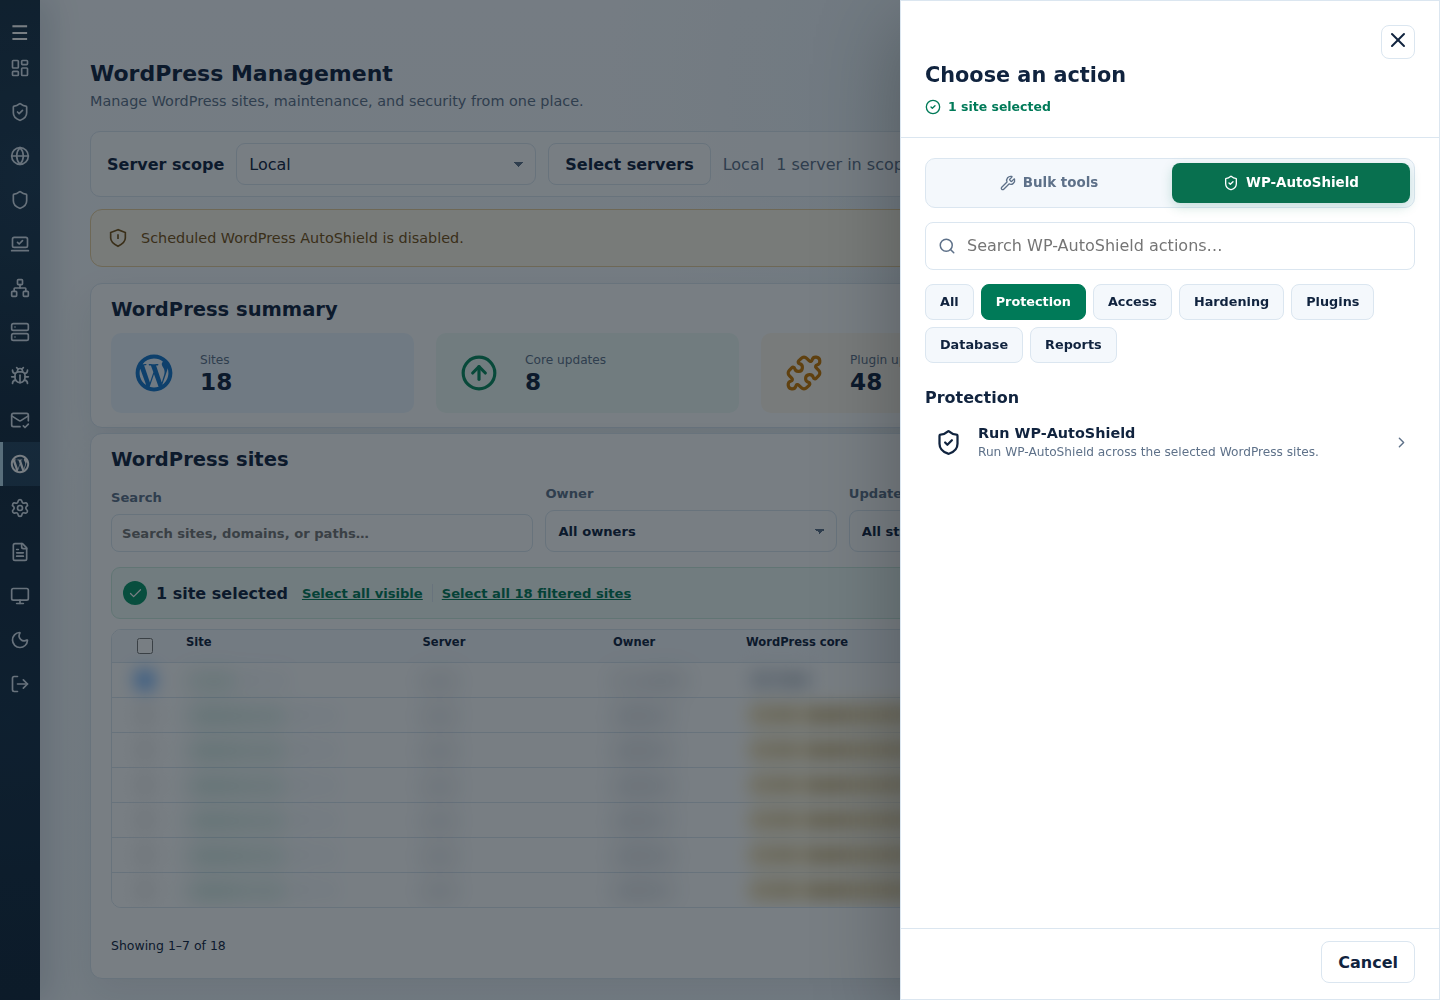
Section titled “2. Apply a security action to selected sites”Open Choose action → WP-AutoShield for a one-off security change. Protection → Run WP-AutoShield applies the current eligible policy; other categories contain the explicit feature actions.
- Follow the site-selection steps.
- Choose the security operation from the WP-AutoShield action catalogue.
- Review its targets and confirm. Check the site’s resulting settings and health.
Read every per-site result under Finished or Needs attention. Daily policy can reapply after a one-off change; add an appropriate exclusion for a lasting exception.
3. Manage exclusions deliberately
Section titled “3. Manage exclusions deliberately”Open Edit Configuration Files → WP-AutoShield exclusions and add the intended site path. Preserve existing entries and save. WP-AutoShield site list, Blacklisted plugins and Required plugin bundle are separate lists. An AutoShield exclusion does not disable malware, integrity or WAF protection.
Follow Exclude sites from AutoShield for account/site path examples and reversing earlier changes. See Additional CSS and editor features for risky-content restrictions, or Remove the security MU plugin for server-wide removal.
For database scanning, follow database-scan exceptions using its separate result-pattern and site lists. For an infected installation, follow Clean an infected WordPress site.
4. Configure integrity monitoring
Section titled “4. Configure integrity monitoring”Use WordPress Integrity to filter sites, run a selected-site check and read recorded findings, actions and earlier checks. The settings below control policy rather than proving a completed clean result.
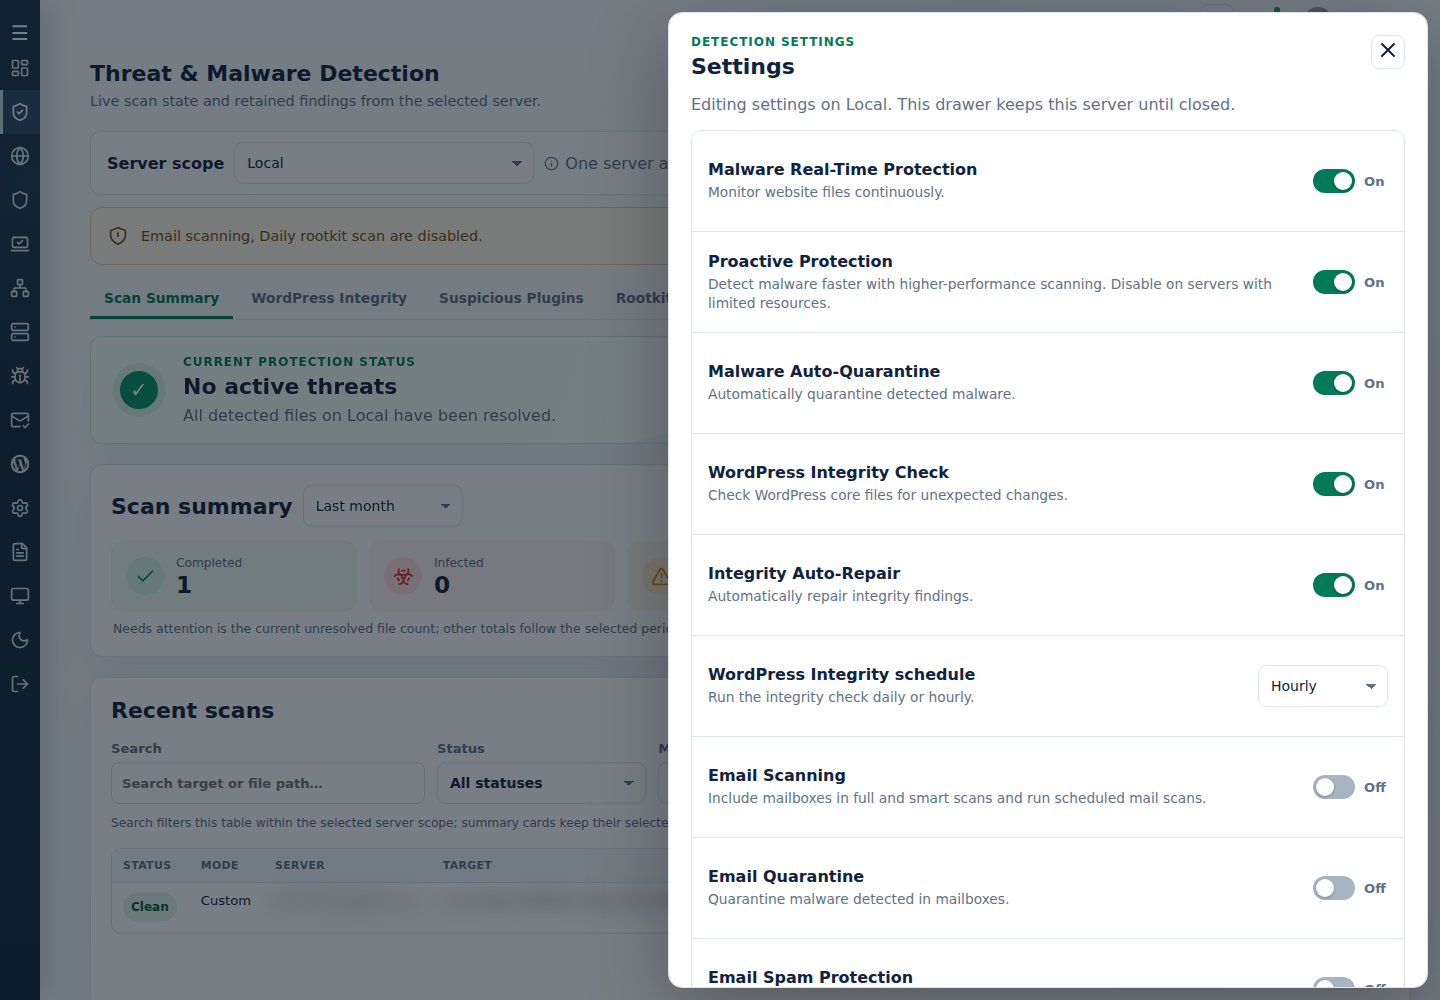
In WordPress Settings, use Integrity monitoring, Automatic file action and Integrity schedule. Equivalent controls are available under Threat & Malware Detection → Settings. There they are labeled WordPress Integrity Check, Integrity Auto-Repair and WordPress Integrity schedule.
| Choice | Packaged default | Effect |
|---|---|---|
| Integrity monitoring | On | Check WordPress core files; full/smart scans also include enabled integrity checks. |
| Automatic file action | Off | When enabled, quarantine applicable unexpected files and conditionally repair core files when safe. |
| Integrity schedule | Daily | Choose Daily or Hourly. This schedule does not change attached full/smart checks. |
Before enabling automatic action, review exclusions and backups. Check each finding’s actual action. For recovery, see quarantine results.
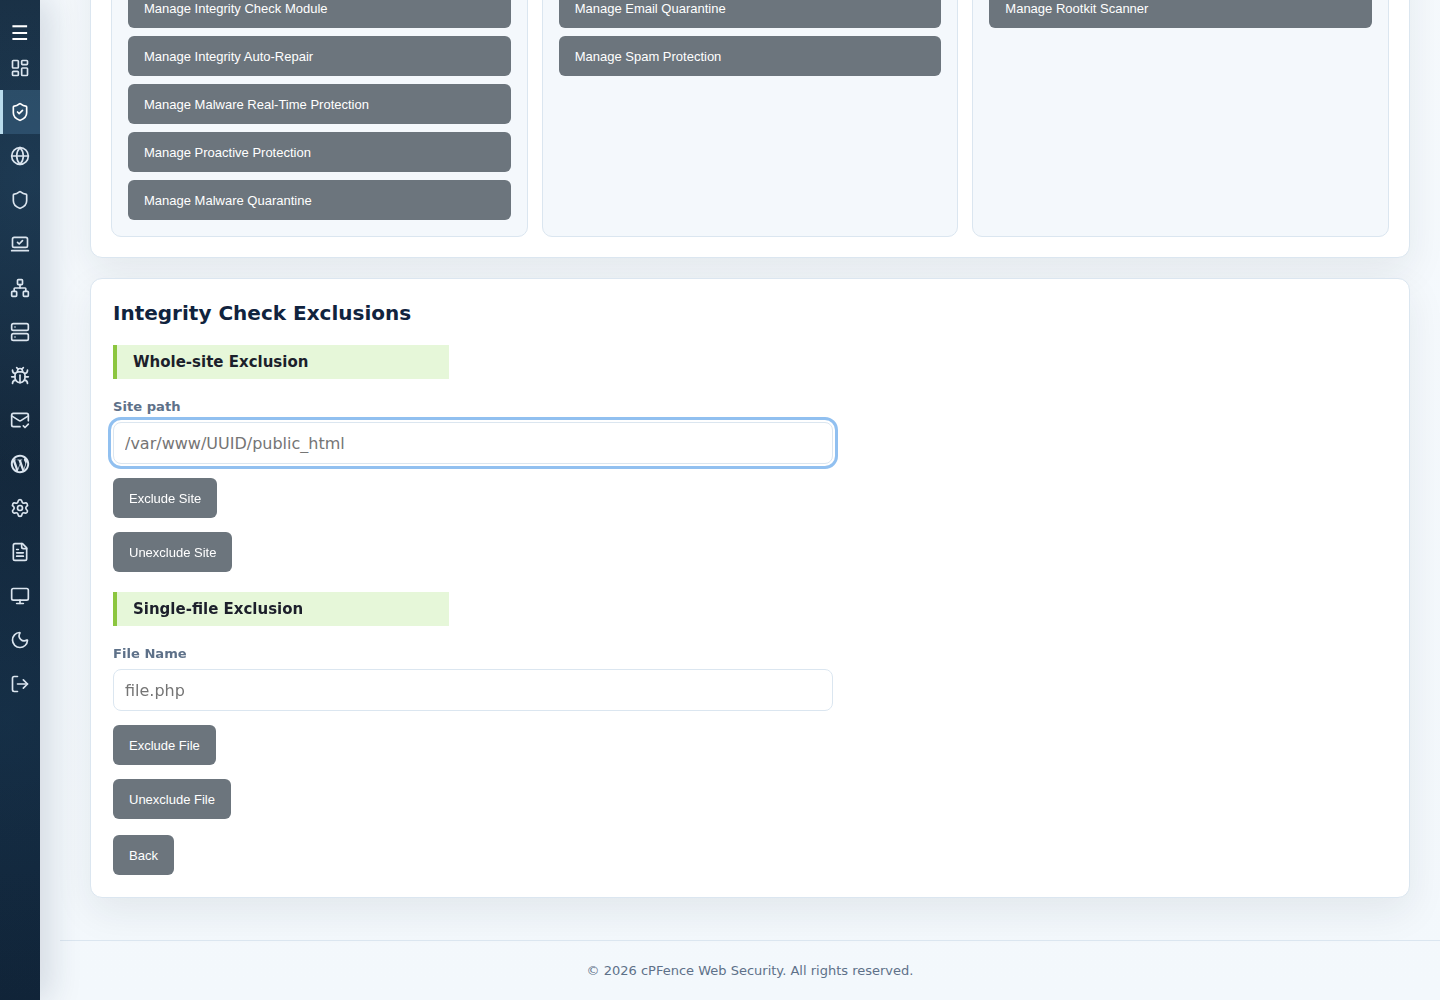
To manage exceptions, open Threat & Malware Detection → Advanced Tools → Integrity exclusions. Set the Advanced Tools server targets separately from the single-server scan summary. A Site path excludes that site; File Name is an exact basename and can exempt that filename across sites on the targeted server. Remove the same entry to resume checking. Use filename exceptions narrowly.
For core repair, follow Restore WordPress core files. Check website health afterward; repairing core does not establish that plugins, themes and accounts are clean.
Focused tasks: login/XML-RPC controls, permissions/hardening, editors/headers/pingbacks and identify sites needing investigation.
Command-line method
Section titled “Command-line method”From a root terminal on the server hosting the sites, enable daily AutoShield:
cpfence --wp-autoshield-onConfigure its child choices in WordPress Settings or /etc/cpfcli/config.conf. The chosen daily protections run at 06:10 server time. To turn daily enforcement off, use cpfence --wp-autoshield-off; earlier site changes remain in place. To apply the eligible saved policy now, use cpfence --run-wp-autoshield and read each step’s final result.
For ordinary one-off security commands, first generate and review the local site list. Use the focused access, permissions and editor tasks for their paired actions and confirmations. Manual bulk tools ignore daily AutoShield exclusions; their CLI scope is the hosting server, not the cluster or checked WebUI rows.
Integrity policy
Section titled “Integrity policy”| Task | Command |
|---|---|
| Enable integrity monitoring | cpfence --enable-integrity-check |
| Disable integrity monitoring | cpfence --disable-integrity-check |
| Enable automatic file action | cpfence --enable-auto-file-action |
| Disable automatic file action | cpfence --disable-auto-file-action |
| Choose daily checks | cpfence --set-check-frequency daily |
| Choose hourly checks | cpfence --set-check-frequency hourly |
Changing the frequency saves policy; it does not enable monitoring or run a scan immediately. Before automatic action, review backups and exclusions. It can quarantine eligible unexpected files and repair eligible core files, so inspect each finding’s recorded action rather than assuming everything was quarantined.
Exclude trusted sites or filenames
Section titled “Exclude trusted sites or filenames”Use the actual full installation path, for example:
cpfence --exclude-integrity-site /var/www/SITE_USER/public_htmlReplace SITE_USER and the path with the intended installation. To resume checking that site:
cpfence --del-exclude-integrity-site /var/www/SITE_USER/public_htmlFor an exact trusted basename:
cpfence --exclude-integrity-file trusted-file.phpRemove that same exception when it is no longer needed:
cpfence --del-exclude-integrity-file trusted-file.phpA filename exception can apply across sites on this server. Keep it narrow. The current site/file lists are /etc/cpfcli/wp-integrity/exclude-sites.txt and /etc/cpfcli/wp-integrity/exclude-files.txt; they are separate from /var/log/cpfenceav/wp-exclude-list.txt for daily AutoShield. The exclusion commands save entries but do not restore files already changed or quarantined.
Keep WordPress secure
Section titled “Keep WordPress secure”- Keep WordPress core, plugins and themes up to date.
- Use strong passwords and appropriate two-factor authentication for administrator accounts.
- Remove unused or outdated extensions and keep usable files/database backups.
- If a site uses an additional security plugin such as Wordfence, review login-plugin compatibility before combining login protections.
The built-in login-limit policy allows five failed attempts within its five-minute window. Idle logout defaults to 120 minutes with saved custom timeouts retained. Secure-key initialization fills missing values, and risky-content restrictions affect future editing rather than removing existing injected posts. Check site requirements and the final results of each protection.
The full original feature families and current CLI alternatives remain in bulk WordPress management and the WordPress command reference.